Summary: in this tutorial, you will learn about the Django REST Framework and how to use it to create a simple but complete RESTful API that manages todos.
Introduction to the Django REST Framework #
Django REST Framework or DRF is a powerful toolkit for developing Web APIs in Django applications. The DRF allows you to create RESTful APIs fast by providing pre-built classes and conventions.
DRF has the following key features:
- Serialization: Serialization allows you to automatically convert Django models to JSON and vice versa, making data transfer between client and server seamless.
- URL Routing: DRF provides URL routing that is the same as Django’s router, which allows you to associate URLs with their API views efficiently.
- Authentication: DRF offers various authentication methods including basic authentication and token authentication. It also supports JWT via a third-party package.
- Permission: DRF allows fine-grained control over user permissions.
- Throttling / Rate Limiting: The throttling and rate features help you to limit the number of requests a client can make within a certain time period.
- Pagination: DRF provides built-in support for paginating large datasets in API responses.
- Browsable API: DRF has a user-friendly HTML interface for testing and exploring APIs directly from the browser.
We’ll continue the Todo project that we left off in the previous tutorial. To start with, you can download the project via this link.
Installing the Django REST Framework package #
First, install the Django REST framework in the project’s virtual environment:
pip install djangorestframeworkCode language: plaintext (plaintext)Second, update the requirements.txt file:
pip freeze > requirements.txtCode language: plaintext (plaintext)Third, register rest_framework app in the settings.py of the project:
INSTALLED_APPS = [
    ...
    'rest_framework',
    ...
]Code language: Python (python)
Creating a new Django REST framework app #
First, create a new directory called api in the project directory to host the API code:
mkdir apiCode language: plaintext (plaintext)Second, create three Python files inside the api directory:
serializers.py– provides a serializer that converts Django’s models into JSON format and vice versa.views.py– houses the API views, similar to Django’s app’s views.urls.py– defines the API endpoint that maps to the API views.
Third, add the api to the INSTALLED_APPS in the settings.py file of the project:
INSTALLED_APPS = [
    ...
    'api',
    ...
]Code language: Python (python)
We’ll create an API with the following endpoints:
| Endpoints | HTTP Verb | Description |
|---|---|---|
api/v1/todos/ | GET | Return all todos |
api/v2/todos/ | POST | Create a new todo |
api/v2/todos/1 | GET | Return the todo with the id 1 |
api/v1/todos/1 | PATCH | Update the todo with id 1 |
api/v1/todos/1 | DELETE | Delete the todo with id 1 |
Creating a serializer class #
Serializer classes allow you to serialize Django’s model instances into JSON and vice versa.
The following defines a serializer class called TodoSerializer in the serializers.py file that serializes the Todo instance to JSON and vice versa:
from rest_framework import serializers
from todo.models import Todo

class TodoSerializer(serializers.ModelSerializer):
    user = serializers.StringRelatedField(read_only=True)

    class Meta:
        model = Todo
        fields = ('id', 'title', 'completed', 'user')Code language: Python (python)
How it works.
First, import the serializers module from rest_framework package:
from rest_framework import serializersCode language: Python (python)Second, import the Todo model from the models module of the todo app:
from todo.models import TodoCode language: Python (python)Third, define the TodoSerializer class that extends the serializers.ModelSerializer class:
class TodoSerializer(serializers.ModelSerializer):
    ...Code language: Python (python)
The ModelSerializer provides a quick way to define a serializer class with fields corresponding to the model’s fields.
Inside the TodoSerializer class, define a Meta class that initializes:
model– specifies theTodomodel.fields– specifies a list of fields for the serializer. If the serializer uses all the fields of the model, you can use the'__all__'instead, like this:
fields = '__all__'Code language: JavaScript (javascript)Since the Todo model is associated with the User model, we specify the user attribute as the StringRelatedField() and set its parameter to read_only.
It means that the Todo will have the string representation of the User which is the username in this case.
The read_only parameter allows the serializer to only read the User model. In other words, the serializer will not be able to update the User model.
Besides the StringRelatedField, DRF provides other types of related fields as shown in the following table:
| Field | Description |
|---|---|
PrimaryKeyRelatedField | Represent the related model as the primary key. |
HyperlinkedRelatedField | Represent the related model as a hyperlink. |
SlugRelatedField | Represent the related model as one of its fields. |
HyperlinkedIdentityField | Represent the related model as a hyperlink to the identity field. |
Since we have completed defining the Serializer class, let’s use it to serialize the Todo model using the TodoSerializer class in the Django Shell.
Serializing data #
First, start the Django Shell from the terminal:
python manage.py shellCode language: CSS (css)Second, import the Todo model and TodoSerializer class:
>>> from api.serializers import TodoSerializer
>>> from todo.models import TodoCode language: JavaScript (javascript)
Third, get the Todo with id 1:
>> todo = Todo.objects.get(id=1)
>>> todo
<Todo: Learn Python>Code language: Python (python)
Fourth, create a new instance of the TodoSerializer with the Todo model and access the data attribute:
>>> serializer = TodoSerializer(todo)
>>> serializer.data
{'id': 1, 'title': 'Learn Python', 'completed': False, 'user': 'john'}Code language: Python (python)
The TodoSerialzier object serializes the todo model into JSON format.
Creating an API view class #
The following define API view classes in the views.py file:
from rest_framework import generics
from .serializers import TodoSerializer
from todo.models import Todo


class TodoList(generics.ListCreateAPIView):
    queryset = Todo.objects.all()
    serializer_class = TodoSerializer

    def perform_create(self, serializer):
        serializer.save(user=self.request.user)


class TodoDetail(generics.RetrieveUpdateDestroyAPIView):
    queryset = Todo.objects.all()
    serializer_class = TodoSerializer
Code language: Python (python)
How it works.
First, import the generics from the rest_framework:
from rest_framework import genericsCode language: Python (python)The generics provide various base view classes such as ListCreateAPIView and RetrieveUpdateDestroyAPIView.
Second, import the TodoSerializer from the serializers of the api app and Todo model from the models of the todo app:
from .serializers import TodoSerializer
from todo.models import TodoCode language: Python (python)
Third, define the TodoList class that extends the ListCreateAPIView class. The TodoList class is responsible for two tasks:
- List all todos.
- Create a new todo.
class TodoList(generics.ListCreateAPIView):
    queryset = Todo.objects.all()
    serializer_class = TodoSerializer

    def perform_create(self, serializer):
        serializer.save(user=self.request.user)Code language: Python (python)
In the TodoList class, specify the queryset used to return all todos and serializer_class used for serialization/deserialization of the Todo instances.
The perform_create() method of the TodoSerializer class is invoked automatically when you save a new Todo instance.
Since each Todo instance needs a User instance, we assign the user from the HTTP request (request)to the user attribute of the Todo instance before saving it to the database.
Finally, define the TodoDetail class that extends the RetrieveUpdateDestroyAPIView class:
class TodoDetail(generics.RetrieveUpdateDestroyAPIView):
    queryset = Todo.objects.all()
    serializer_class = TodoSerializerCode language: Python (python)
The TodoDetail class is in charge of the following operations:
- Retrieve a todo by id.
- Update an existing todo.
- Destroy (or delete) a todo.
In the TodoDetail class, we also need to define the queryset and serializer_class.
Defining API endpoints #
The following define API endpoints in the urls.py of the api app:
from django.urls import path

from .views import TodoList, TodoDetail

urlpatterns = [
    path('todos/', TodoList.as_view(), name='todo_list'),
    path('todos/<int:pk>/', TodoDetail.as_view(), name='todo_detail'),
]Code language: Python (python)
Interacting with API using the Browsable API #
Django REST Framework support generating user-friendly HTML pages of all resources when you request the HTML format.
These pages allow you to browse the APIs easily and submit data to the API endpoints using POST, PUT, PATCH, and DELETE.
Getting all todos #
Open the endpoint http://localhost:8000/api/v1/todos/, and you’ll see the following page.
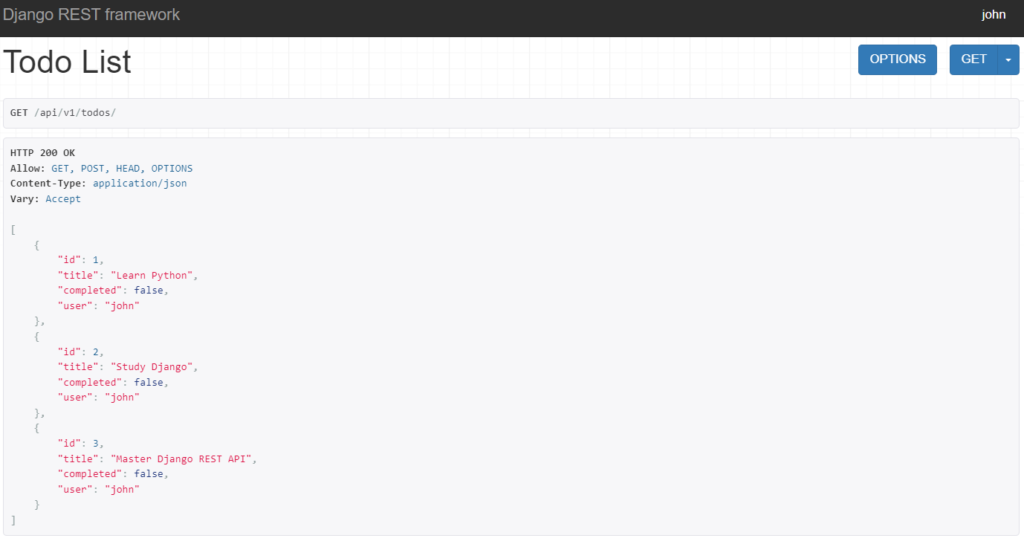
By opening the api/v1/todos/ in the web browser, you are performing a GET request to the endpoint. The page returns a list of todos list in the nicely HTML formatted page.
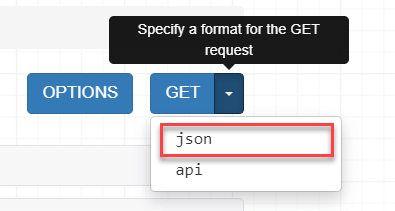
To get the raw JSON format, you specify the format of the GET request by clicking the json menu item in the GET button as shown in the following picture :
The API will return the raw JSON:
[{"id":1,"title":"Learn Python","completed":false,"user":"john"},{"id":2,"title":"Study Django","completed":false,"user":"john"},{"id":3,"title":"Master Django REST API","completed":false,"user":"john"}]Code language: JSON / JSON with Comments (json)If you have a JSON viewer extension installed on the web browser, you can see the human-readable JSON format as follows:
[
  {
    "id": 1,
    "title": "Learn Python",
    "completed": false,
    "user": "john"
  },
  {
    "id": 2,
    "title": "Study Django",
    "completed": false,
    "user": "john"
  },
  {
    "id": 3,
    "title": "Master Django REST API",
    "completed": false,
    "user": "john"
  }
]Code language: JSON / JSON with Comments (json)
Creating a new todo #
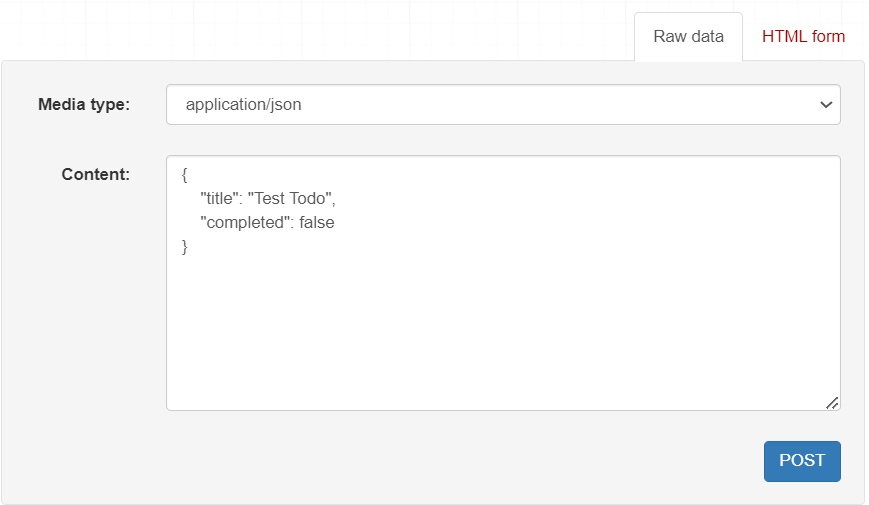
Open the endpoint /api/v1/todos/. But this time we’ll issue a POST request instead of GET request.
First, enter the todo information:
Second, click the POST button, and you’ll get the following response:
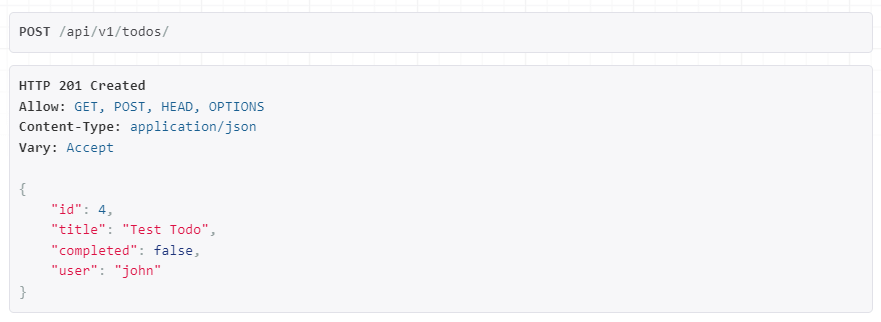
The API creates a new todo with id 4. Also, the user is the one that you’re currently logged in.
Notice that you need to log in to the admin site as a user e.g., john so that the perform_create() method of the TodoList can get the user information from the request.
Getting a specific todo #
Open the endpoint /api/v1/todos/4/ to get detailed information on the todo with id 4:
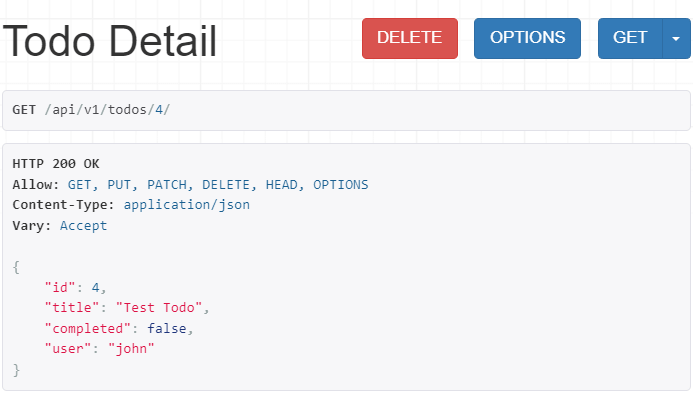
In this case, we are making a GET request to the API endpoint /api/v1/todos/4/
Updating a todo #
The page for updating a todo is also the one that gets the detail of a todo.
Open the endpoint /api/v1/todos/4/ to get the detail of the todo with id 4 and scroll down to the HTML form:
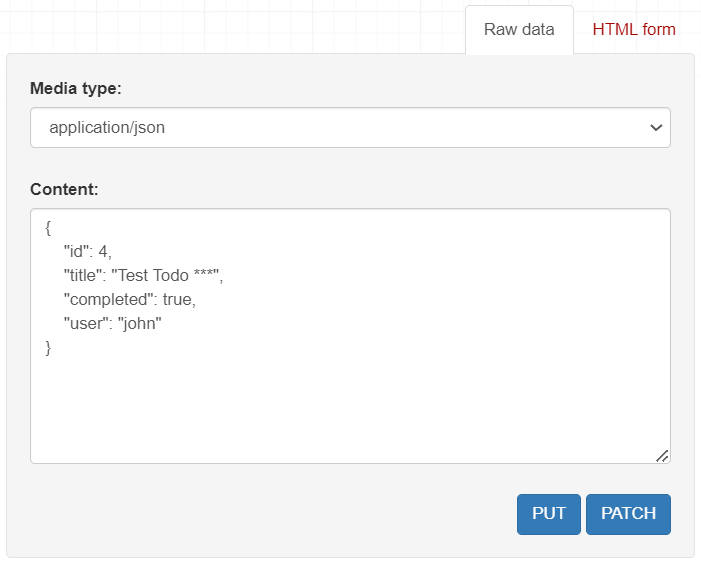
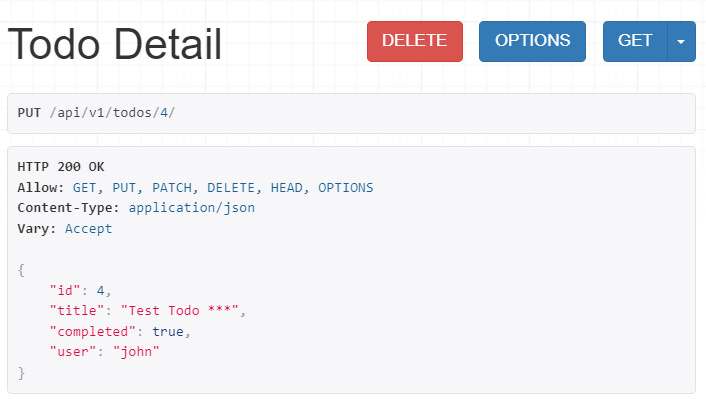
Second, modify some values of the Todo JSON, and click the PUT button to issue a PUT request, and you’ll get the following response:
Deleting a todo #
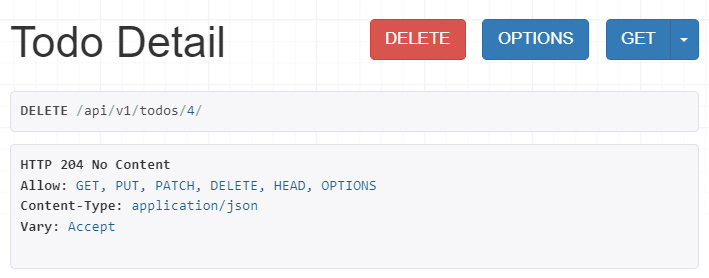
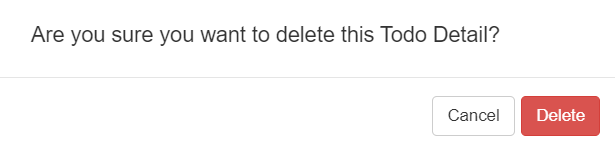
Open the endpoint to view the todo with id 4: /api/v1/todos/4/ and click the Delete button:
It’ll prompt for the delete confirmation:
If you click the Delete button, you’ll get the following response:
The API issued a DELETE request to the endpoint and returned HTTP status 204 to indicate that the todo has been deleted successfully.
Download the project #
Download the project source code here.
Summary #
- Use Django REST Framework to build RESTful API quickly.
- The steps for defining API are creating a serializer class (
serializers.py), defining views (views.py), and wiring up the views with URLs (urls.py). - Use the browsable API interface to interact with APIs.