Summary: in this tutorial, you’ll learn how to use the Django DetailView class to display an object.
This tutorial begins where the Django ListView tutorial left off.
Defining a DetailView #
The Django DetailView allows you to define a class-based view that displays the details of an object. To use the DetailView class, you define a class that inherits from the DetailView class.
For example, the following defines the TaskDetail class-based view that displays the detail of a task of the Todo app:
from django.shortcuts import render
from django.views.generic.list import ListView
from django.views.generic.detail import DetailView
from .models import Task


class TaskDetail(DetailView):
    model = Task
    context_object_name = 'task'

#...  Code language: Python (python)
How it works.
First, import the DetailView from the django.views.generic.detail:
from django.views.generic.detail import DetailViewCode language: Python (python)Second, define a TaskDetail class that inherits from the DetailView class. In the TaskDetail class, we define the following attributes:
modelspecifies the class of the object that will be displayed.context_object_namespecifies the name of the object in the template. By default, Django usesobjectas the object name in the template. To make it more obvious, we use thetaskas the object name instead.
By default, the TaskDetail class will load the template with the name task_detail.html from the templates/todo application.
If you want to use a different template name, you can use the template_name attribute in the TaskDetail class.
Create the task_detail.html template #
Create the task_detail.html template in the templates/blog directory with the following code:
{%extends 'base.html'%}

{%block content%}

 <article class="task">
	<header>
		<h2>{{ task.title }}</h2>
		<span class="badge {% if task.completed %}badge-completed{% else %}badge-pending{%endif%}">
			{% if task.completed %} Completed {%else%} Pending {%endif%}
		</span>
	</header>
	<p>{{task.description}}</p>
</article>

{%endblock content%}Code language: HTML, XML (xml)
The task_detail.html template extends base.html template.
The task_detail.html template uses the task as the object and displays the task’s attributes including title, status (completed or not), and description.
Defining a route #
Define a route that maps the URL that displays a task with the result of the as_view() method of the TaskDetail class:
from django.urls import path
from .views import home, TaskList, TaskDetail

urlpatterns = [
    path('', home, name='home'),
    path('tasks/', TaskList.as_view(),name='tasks'),
    path('task/<int:pk>/',TaskDetail.as_view(),name='task'),
]Code language: Python (python)
The URL accepts an integer as the id (or primary key, pk) of the task. The TaskDetail will take this pk parameter, select the task from the database by the id, construct a Task object, and pass it to a template.
Modifying the task_list.html template #
Modify the task_list.html template to include the link to each task on the task list using the url tag:
{%extends 'base.html'%}

{%block content%}

<div class="center">
	<h2>My Todo List</h2>
	{% if tasks %}
	<ul class="tasks">
		{% for task in tasks %}
			<li><a href="{% url 'task' task.id %}" class="{% if task.completed%}completed{%endif%}">{{ task.title }}</a>
				 <div  class="task-controls">
				 	<a href="#"><i class="bi bi-trash"></i> </a>
					<a href="#"><i class="bi bi-pencil-square"></i></a>
		         </div>
		    </li>
		{% endfor %}
	{% else %}
		<p>? Yay, you have no pending tasks!</p>
	{% endif %}
	</ul>
</div>
{%endblock content%}
Code language: HTML, XML (xml)
When you click the link of each tag, you’ll be redirected to the task detail page.
Run the Django dev server:
python manage.py runserverCode language: plaintext (plaintext)and open the task list:
http://127.0.0.1:8000/tasks/Code language: plaintext (plaintext)you’ll see the following task list:
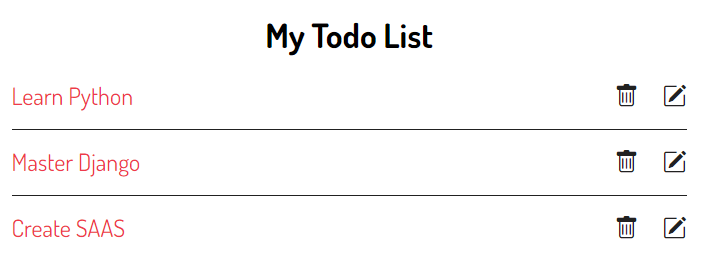
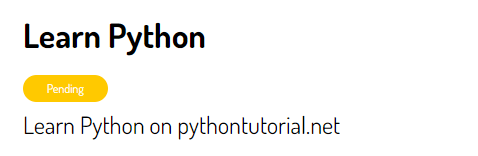
And click a task e.g., Learn Python, you’ll be redirected to the task detail page:
You can download the final code for this Django DetailView tutorial here.
Summary #
- Use Django
DetailViewto display the detail of an object.