Summary: in this tutorial, you’ll learn how to use the Django CreateView class to define a class-based view that creates a task for the Todo application.
This tutorial begins where the Django DetailView tutorial left off.
Defining the CreateView class #
The CreateView class allows you to create a class-based view that displays a form for creating an object, redisplaying the form with validation errors, and saving the object into the database.
To use the CreateView class, you define a class that inherits from it and add some attributes and methods.
For example, the following uses the CreateView class to define a class-based view that renders a form for creating a new task in the Todo app:
# ..
from django.views.generic.edit import CreateView
from django.contrib import messages
from django.urls import reverse_lazy
from .models import Task

class TaskCreate(CreateView):
    model = Task
    fields = ['title','description','completed']
    success_url = reverse_lazy('tasks')


    def form_valid(self, form):
        form.instance.user = self.request.user
        messages.success(self.request, "The task was created successfully.")
        return super(TaskCreate,self).form_valid(form)

# other classes & functionsCode language: Python (python)
How it works:
First, import the CreateView class, the reverse_lazy() function, and messages module.
Second, define the TaskCreate class that inherits from the CreateView class. In the CreateView class, we define the following attributes and methods:
modelspecifies the class of the object to be created (Task).fieldsis a list of fields that display on the form. In this example, the form will display title, description, and completed attributes of theTaskmodel.success_urlis the target URL that Django will redirect to once a task is created successfully. In this example, we redirect to the task list using thereverse_lazy()reverse_lazy()form_valid()– is a method called once the form is posted successfully. In this example, we set the user to the currently logged user, create a flash message, and return the result of theform_valid()method of the superclass.
By default, the CreateView class uses the task_form.html template from the templates/todo with the following naming convention:
model_form.htmlCode language: Python (python)If you want to use a different template, you can override the default template using the template_name attribute in the TaskCreate class.
Creating the task_form.html template #
Create the task_form.html in the templates/todo directory with the following code:
{%extends 'base.html'%}

{%block content%}

<div class="center">
	<form method="post" novalidate class="card">
	 	{%csrf_token %}

	 	<h2>Create Task</h2>
		{% for field in form %}
			{% if field.name == 'completed' %}
				<p>
					{{ field.label_tag }}
					{{ field }}
				</p>
				{% if field.errors %}
	        		<small class="error">{{ field.errors|striptags  }}</small>
	        	{% endif %}
			{% else %}
	    		{{ field.label_tag }}
	        	{{ field }}
	        	{% if field.errors %}
	        		<small class="error">{{ field.errors|striptags  }}</small>
	        	{% endif %}
	        {% endif %}
		{% endfor %}

		<div class="form-buttons">
			<input type="submit" value="Save" class="btn btn-primary"/>
			<a href="{%url 'tasks'%}" class="btn btn-outline">Cancel</a>
		</div>
	</form>
</div>

{%endblock content%}Code language: HTML, XML (xml)
In the task_form.html, we render the form fields manually. If you want to automatically generate the form, you can use one of the following attributes:
{{ form.as_p }}   # render the form as <p>
{{ form.as_div }} # render the form as <div>
{{ form.as_ul }}  # redner the form as <ul>Code language: Python (python)
Defining the route #
Add a route to the urls.py of the todo application by mapping an URL with the result of the as_view() method of the TaskCreate class:
from django.urls import path
from .views import home, TaskList, TaskDetail, TaskCreate

urlpatterns = [
    path('', home, name='home'),
    path('tasks/', TaskList.as_view(),name='tasks'),
    path('task/<int:pk>/', TaskDetail.as_view(),name='task'),
    path('task/create/', TaskCreate.as_view(),name='task-create'),
]Code language: Python (python)
Displaying flash messages & adding a link to the navigation #
Modify the base.html template of the project to:
- Display the flash messages.
- Add the
New Tasklink to the navigation.
{%load static %}
<!DOCTYPE html>
<html lang="en">
<head>
<meta charset="UTF-8">
<meta name="viewport" content="width=device-width, initial-scale=1.0">
<link rel="stylesheet" href="{% static 'css/style.css' %}" />
<title>Todo List</title>
</head>
<body>
<header class="header">
<div class="container">
<a href="{%url 'home'%}" class="logo">Todo</a>
<nav class="nav">
<a href="{% url 'home'%}"><i class="bi bi-house-fill"></i> Home</a>
<a href="{% url 'tasks' %}"><i class="bi bi-list-task"></i> My Tasks</a>
<a href="{% url 'task-create' %}"><i class="bi bi-plus-circle"></i> Create Task</a>
</nav>
</div>
</header>
<main>
<div class="container">
{% if messages %}
{% for message in messages %}
<div class="alert alert-{{message.tags}}">
{{message}}
</div>
{% endfor %}
{% endif %}
{%block content %}
{%endblock content%}
</div>
</main>
<footer class="footer">
<div class="container">
<p>© Copyright {% now "Y" %} by <a href="https://www.pythontutorial.net">Python Tutorial</a></p>
</div>
</footer>
</body>
</html>
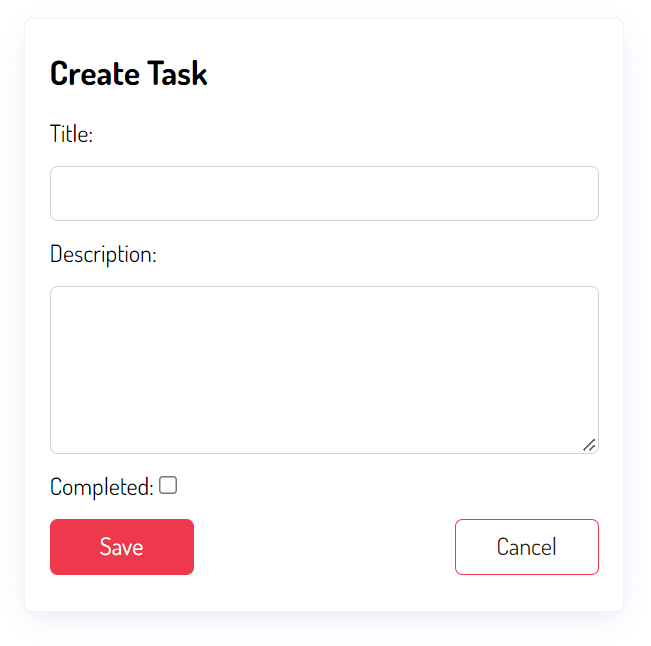
Code language: HTML, XML (xml)Run the Django dev server and open the URL http://127.0.0.1:8000/task/create/, you’ll see the following form:
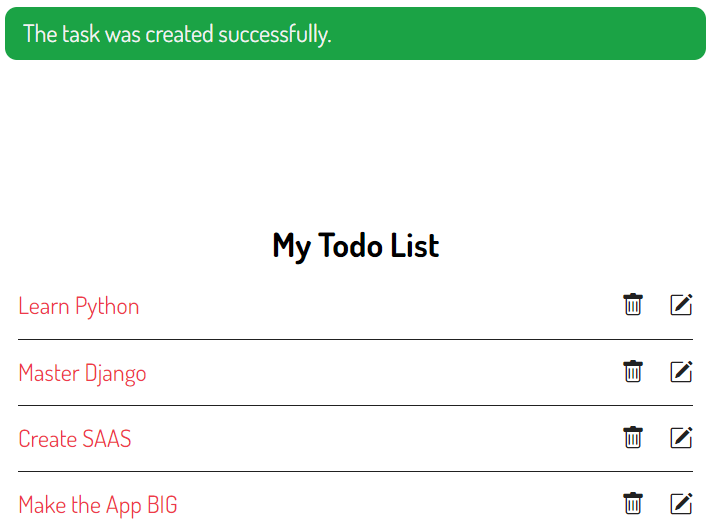
Enter the title and description and click the Save button, you’ll be redirected to the task list page with a message:
You can download the final code for this Django CreateView tutorial here.
Summary #
- Use the Django
CreateViewclass to define a class-based view that creates an object.