Summary: in this tutorial, you’ll learn about Django ORM and how to use Django ORM API to interact with relational databases.
Introduction to Django ORM #
ORM stands for object-relational mapping. ORM is a technique that allows you to manipulate data in a relational database using object-oriented programming.
Django ORM allows you to use the same Python API to interact with various relational databases including PostgreSQL, MySQL, Oracle, and SQLite. See a completed list of supported databases here.
Django ORM uses the active record pattern:
- A class maps to a single table in the database. The class is often called a model class.
- An object of the class maps to a single row in the table.
Once you define a model class, you can access predefined methods to create, read, update, and delete data.
Also, Django automatically generates an admin site for managing the data of the models. Let’s take a look at a simple example to see how Django ORM works.
Setting up a base project #
We’ll set up a base project with a new virtual environment.
Creating a new virtual environment #
First, create a new virtual environment using the built-in venv module:
python -m venv venvCode language: Python (python)Second, activate the virtual environment:
venv\scripts\activateCode language: Python (python)Third, install the django & django-extensions package:
pip install django django-extensionsCode language: Python (python)The django-extensions package provides you with some custom extensions for the Django framework. We’ll use django-extensions package for outputting the generated SQL by Django ORM.
Creating a new project #
First, create a new Django project called django_orm:
django-admin startproject django_ormCode language: Python (python)Second, create an HR application inside the django_orm project:
cd django_orm
python manage.py startapp hrCode language: Python (python)
Third, register both hr and django_extensions in the INSTALLED_APPS of the settings.py of the project:
INSTALLED_APPS = [
    # ...
    'django_extensions',
    'hr',
]
Code language: Python (python)
Setting up the PostgreSQL database server #
First, install a PostgreSQL database server on your local computer.
Second, log in to the PostgreSQL database server. It’ll prompt you for the password of the postgres user. Note that you use the same password you entered for the postgres user during the installation.
psql -U postgres
Password for user postgres:Code language: Python (python)
Third, create a new database with the name hr and type exit to quit the psql program:
postgres=# create database hr;
CREATE DATABASE
postgres=# exitCode language: Python (python)
Connecting to the PostgreSQL from Django #
First, configure the database connection in the settings.py of the django_orm project:
DATABASES = {
    'default': {
        'ENGINE': 'django.db.backends.postgresql',
        'NAME': 'hr',
        'USER': 'postgres',
        'PASSWORD': 'POSTGRES_PASSWORD',
        'HOST': 'localhost',
        'PORT': '',
    }
}Code language: Python (python)
Note that you change the POSTGRES_PASSWORD to your password.
Second, install the psycopg2 package to allow Django to connect to the PostgreSQL database server:
pip install psycopg2Code language: Python (python)Third, run the Django development server:
python manage.py runserverCode language: Python (python)You’ll see the Django default homepage:
Defining a model #
First, define an Employee class in the hr application that has two fields first_name and last_name:
from django.db import models


class Employee(models.Model):
    first_name = models.CharField(max_length=100)
    last_name = models.CharField(max_length=100)

    def __str__(self):
        return f'{self.first_name} {self.last_name}'Code language: Python (python)
Second, make migrations using the makemigrations command:
python manage.py makemigrationsCode language: Python (python)Output:
Migrations for 'hr':
  hr\migrations\0001_initial.py
    - Create model EmployeeCode language: Python (python)
Third, propagate the changes to the database using the migrate command:
python manage.py migrateCode language: Python (python)Django creates a lot of tables including the ones for the built-in models such as User and Group. In this tutorial, we’ll focus on the Employee class.
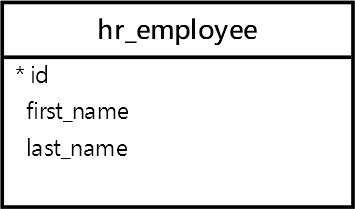
Based on the Employee model class, Django ORM creates a table hr_employee in the database:
Django combines the app name and class name to generate the table name:
app_modelclassCode language: Python (python)In this example, the app name is hr and the class name is Employee. Therefore, Django creates the table with the name hr_employee. Note that Django converts the class name to lowercase before appending it to the app name.
The Employee model class has two fields first_name and last_name. Since the Employee class inherits from models.Model class, Django automatically adds the id field as an auto-increment field called id. Therefore, the hr_employee table has three columns id, first_name, and last_name.
To interact with the hr_employee table, you can run the shell_plus command that comes from the django-extensions package.
Note that Django provides you with a built-in shell command. However, the shell_plus command is more convenient to work with. For example, it automatically loads the models defined in the project and displays the generated SQL.
Run the shell_plus command with the --print-sql option:
python manage.py shell_plus --print-sqlCode language: Python (python)Inserting data #
First, create a new Employee object and call the save() method to insert a new row into the table:
>>> e = Employee(first_name='John',last_name='Doe')
>>> e.save()
INSERT INTO "hr_employee" ("first_name", "last_name")
VALUES ('John', 'Doe') RETURNING "hr_employee"."id"
Execution time: 0.003234s [Database: default]Code language: Python (python)
In this example, you don’t need to set the value for the id column. The database automatically generates its value and Django will set it once you insert a new row into the table.
As shown in the output, Django uses the INSERT statement to insert a new row with two columns first_name and last_name into hr_employee table.
Second, insert the second employee with the first name Jane and last name Doe:
>>> e = Employee(first_name='Jane',last_name='Doe')
>>> e.save()
INSERT INTO "hr_employee" ("first_name", "last_name")
VALUES ('Jane', 'Doe') RETURNING "hr_employee"."id"
Execution time: 0.002195s [Database: default]Code language: Python (python)
Now, the hr_employee table has two rows with id 1 and 2.
Selecting data #
To select all rows from the hr_employees table, you use the all() method like this:
>>> Employee.objects.all()
SELECT "hr_employee"."id",
       "hr_employee"."first_name",
       "hr_employee"."last_name"
  FROM "hr_employee"
 LIMIT 21
Execution time: 0.001856s [Database: default]
<QuerySet [<Employee: John Doe>, <Employee: Jane Doe>]>Code language: Python (python)
How it works.
- First, Django uses the
SELECTstatement to select rows from thehr_employeetable. - Second, Django converts rows into
Employeeobjects and returns aQuerySetwhich contains theEmployeeobjects.
Notice that LIMIT is added by Django to return 21 records for displaying on the shell.
To select a single row by id, you can use the get() method. For example, the following returns the employee with id 1:
>>> e = Employee.objects.get(id=1)
SELECT "hr_employee"."id",
       "hr_employee"."first_name",
       "hr_employee"."last_name"
  FROM "hr_employee"
 WHERE "hr_employee"."id" = 1
 LIMIT 21
Execution time: 0.001003s [Database: default]
>>> e
<Employee: John Doe>Code language: Python (python)
Unlike the all() method, the get() method returns an Employee object instead of a QuerySet.
To find employees by their first name, you can use the filter() method of the QuerySet object. For example, the following finds employees with the first name Jane:
>>> Employee.objects.filter(first_name='Jane')
SELECT "hr_employee"."id",
       "hr_employee"."first_name",
       "hr_employee"."last_name"
  FROM "hr_employee"
 WHERE "hr_employee"."first_name" = 'Jane'
 LIMIT 21
Execution time: 0.000000s [Database: default]
<QuerySet [<Employee: Jane Doe>]>Code language: Python (python)
Updating data #
First, select the employee with id 2:
>>> e = Employee.objects.get(id=2)
SELECT "hr_employee"."id",
       "hr_employee"."first_name",
       "hr_employee"."last_name"
  FROM "hr_employee"
 WHERE "hr_employee"."id" = 2
 LIMIT 21
Execution time: 0.001022s [Database: default]Code language: Python (python)
Second, update the last name of the selected employee to Smith:
>>> e.last_name = 'Smith'
>>> e.save()
UPDATE "hr_employee"
   SET "first_name" = 'Jane',
       "last_name" = 'Smith'
 WHERE "hr_employee"."id" = 2
Execution time: 0.004019s [Database: default]
>>> e
<Employee: Jane Smith>Code language: Python (python)
Deleting data #
To delete an instance of a model, you use the delete() method. The following example deletes the employee with id 2:
>>> e.delete()
DELETE
  FROM "hr_employee"
 WHERE "hr_employee"."id" IN (2)
Execution time: 0.002001s [Database: default]
(1, {'hr.Employee': 1})Code language: Python (python)
To delete all instances of a model, you use the all() method to select all employees and call the delete() method to delete all the selected employees:
>>> Employee.objects.all().delete()
DELETE
  FROM "hr_employee"
Execution time: 0.001076s [Database: default]
(1, {'hr.Employee': 1})Code language: Python (python)
Django uses the DELETE statement without a WHERE clause to delete all rows from the hr_employee table.
Download the Django ORM here.
Summary #
- Django ORM allows you to interact with relational databases using Python API.
- Django ORM uses the active record pattern, in which a class maps to a table and an object maps to a row.
- Use
all()method to get all rows from a table. - Use
get()method to select a row by id. - Use
filter()method to filter rows by one or more fields. - Use
save()method to create a new row or update an existing row. - Use
delete()method to delete one or more rows from a table.