Summary: in this tutorial, you’ll learn how to implement the Django Password Reset feature that allows users to reset their passwords using email addresses.
This tutorial begins where the Django FormView tutorial left off.
Introduction to the password reset in Django #
The following diagram illustrates the flow that allows a user to reset the password using an email address:
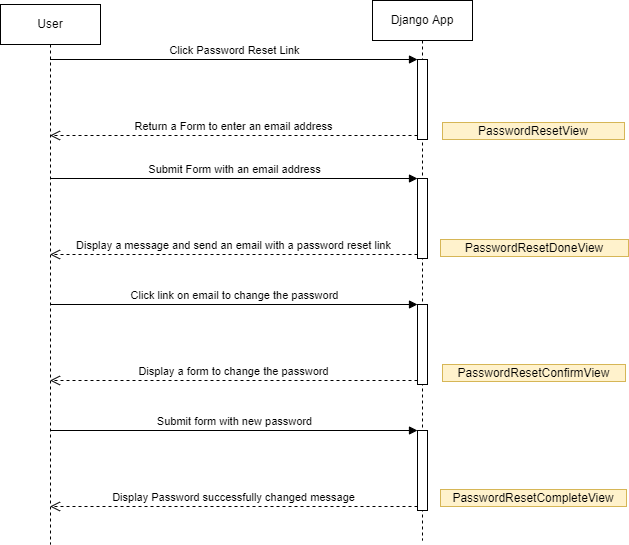
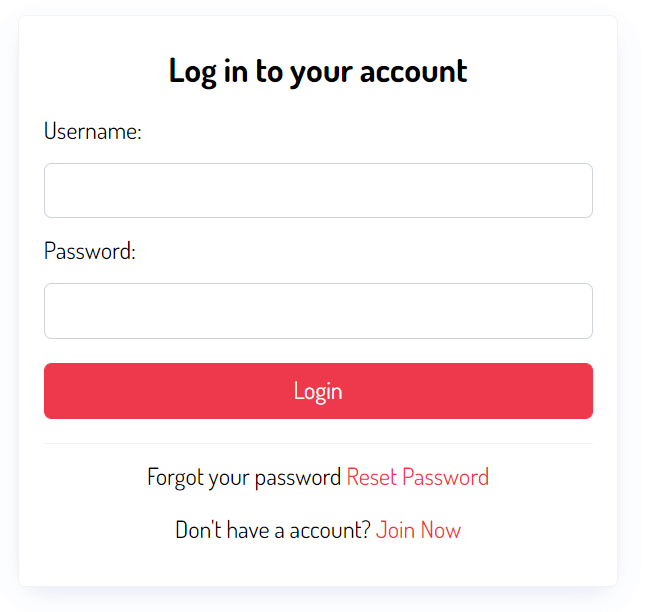
First, the user clicks the Reset Password link on the login form:
Django displays a form that allows the user to enter an email address for receiving the password reset link:
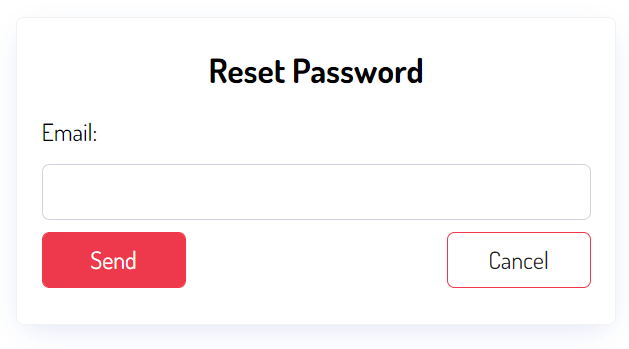
Django uses the PasswordResetView view to render this form.
Second, the user enters an email address and clicks the Send button:
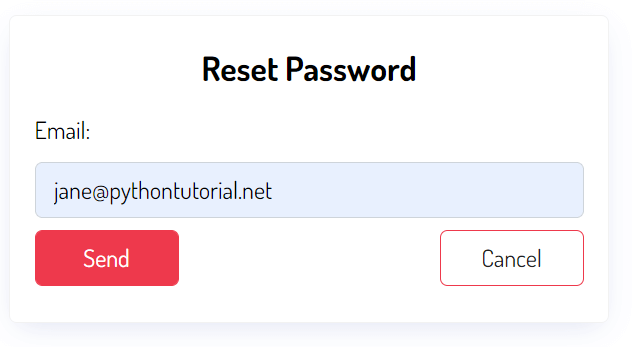
Django sends an email to the input email address and displays a message that instructs the user to check the inbox.
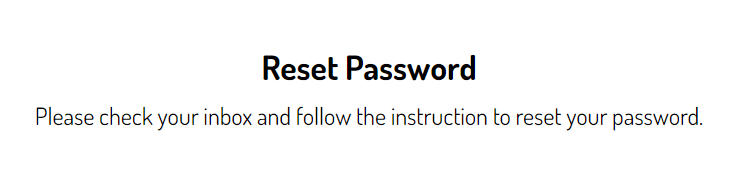
Django uses the PasswordResetDoneView class to render this form.
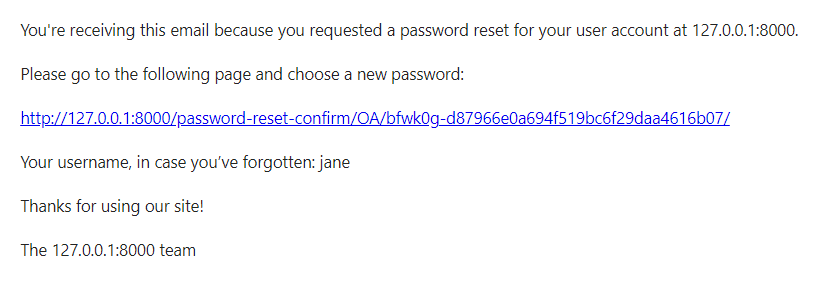
Third, the user opens the inbox and clicks the password reset link:
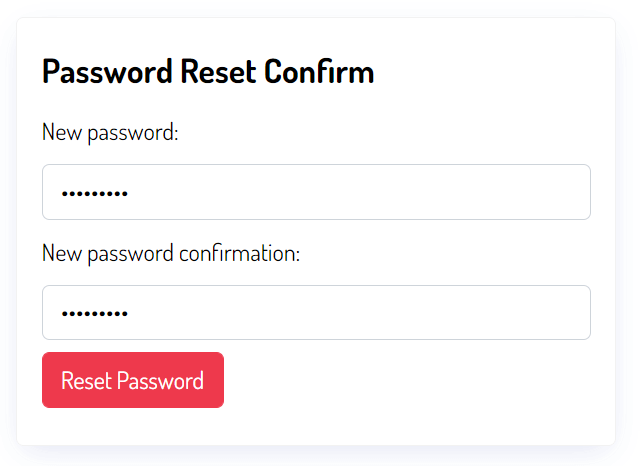
Finally, the user enters the new password and clicks the Reset Password button:
Django displays a confirmation message:

Django uses the PasswordResetCompleteView to handle this page.
Implementing password reset for the Todo app #
Modify the views.py of the users application to map the password reset URL with the corresponding class-based views:
from django.urls import path
from .views import MyLoginView, RegisterView

from django.contrib.auth.views import (
    LogoutView,
    PasswordResetView,
    PasswordResetDoneView,
    PasswordResetConfirmView,
    PasswordResetCompleteView
)

urlpatterns = [
    path('login/', MyLoginView.as_view(redirect_authenticated_user=True),name='login'),
    path('logout/', LogoutView.as_view(next_page='login'),name='logout'),
    path('register/', RegisterView.as_view(),name='register'),
    path('password-reset/', PasswordResetView.as_view(template_name='users/password_reset.html'),name='password-reset'),
    path('password-reset/done/', PasswordResetDoneView.as_view(template_name='users/password_reset_done.html'),name='password_reset_done'),
    path('password-reset-confirm/<uidb64>/<token>/', PasswordResetConfirmView.as_view(template_name='users/password_reset_confirm.html'),name='password_reset_confirm'),
    path('password-reset-complete/',PasswordResetCompleteView.as_view(template_name='users/password_reset_complete.html'),name='password_reset_complete'),
]Code language: Python (python)
PasswordResetView #
First, map the password reset URL 'password-reset/' with the result of the as_view() method of the PasswordResetViewPasswordResetViewusers/password_reset.html template to render the form.
Second, create the password_reset.html template in the templates/users directory:
{%extends 'base.html'%}

{%block content%}
<div class="center">
	<form method="post" class="card">
		{% csrf_token %}
	    <h2 class="text-center">Reset Password</h2>
		{% for field in form %}
	    		{{ field.label_tag }}
	        	{{ field }}
	        	{% if field.errors %}
	        		<small>{{ field.errors|striptags  }}</small>
	        	{% endif %}
		{% endfor %}
		<div class="form-buttons">
			<input type="submit" value="Send" class="btn btn-primary">
			<a href="{%url 'login' %}"  class="btn btn-outline">Cancel</a>
		</div>
	</form>
	</div>
{%endblock content%}Code language: Python (python)
PasswordResetDoneView #
First, map the password-reset/done/ with the result of the as_view() method of the PasswordResetDoneViewPasswordResetDoneViewpassword_reset_done.html template to render the page:
path('password-reset/done/', PasswordResetDoneView.as_view(template_name='users/password_reset_done.html'),name='password_reset_done'),Code language: Python (python)Second, create the reset_password_done.html template in the templates/users directory:
{%extends 'base.html'%}

{%block content%}

<div class="center card">
	<h2>Reset Password</h2>
	<p>Please check your inbox and follow the instruction to reset your password.</p>
</div>

{%endblock content%}Code language: Python (python)
PasswordResetConfirmView #
First, map the password-reset-confirm/<uidb64>/<token>/ URL with the result of the as_view() of the PasswordResetConfirmView class:
path('password-reset-confirm/<uidb64>/<token>/', PasswordResetConfirmView.as_view(template_name='users/password_reset_confirm.html'),name='password_reset_confirm'),Code language: Python (python)The PasswordResetConfirmView class uses the password_reset_confirm.html template to render the page. A reset password URL looks like this:
http://127.0.0.1:8000/password-reset-confirm/OA/bfwk0g-d87966e0a694f519bc6f29daa4616b07/Code language: Python (python)Second, create the password_reset_confirm.html template in the templates/users directory:
{%extends 'base.html'%}

{%block content%}

<div class="center">
	<form method="post" class="card">
	  {% csrf_token %}
	  <h2>Password Reset Confirm</h2>

	  {% for field in form %}
	    		{{ field.label_tag }}
	        	{{ field }}
	        	{% if field.errors %}
	        		<small>{{ field.errors|striptags  }}</small>
	        	{% endif %}
		{% endfor %}


	  <div>
	    <button type="submit" class="btn btn-primary">Reset Password</button>
	  </div>
	</form>
</div>


{%endblock content%}Code language: Python (python)
PasswordResetCompleteView #
First, map the password reset complete URL with the as_view() method of the PasswordResetCompleteView class.
{%extends 'base.html'%}

{%block content%}

<div class="card center">
	<p>Your password has been changed successfully. Please <a href="{% url 'login' %}">Login</a></p>
</div>

{%endblock content%}Code language: Python (python)
Second, create the password_reset_complete.html template in the templates/users directory
{%extends 'base.html'%}

{%block content%}
  <div class="center">
	  <form method="post" class="card" novalidate>
	  	{% csrf_token %}
	    <h2 class="text-center">Log in to your account</h2>
		{% for field in form %}
	    		{{ field.label_tag }}
	        	{{ field }}
	        	{% if field.errors %}
	        		<small>{{ field.errors|striptags  }}</small>
	        	{% endif %}
		{% endfor %}

		<input type="submit" value="Login" class="btn btn-primary full-width">
		<hr>
		<p class="text-center">Forgot your password <a href="{%url 'password-reset'%}">Reset Password</a></p>
		<p class="text-center">Don't have a account? <a href="{%url 'register'%}">Join Now</a></p>
	</form>
</div>

{%endblock content%}Code language: Python (python)
Configuring SMTP for sending emails from the Django app #
To send emails in Django, you need to have a local Simple Mail Transfer Protocol (SMTPSMTP
Once having an SMTP server, you can add its information to the settings.py of the Django project with the following information:
EMAIL_HOST: theSMTPserver host.EMAIL_PORT: theSMTPport, the default is 25.EMAIL_HOST_USER: The user name for theSMTPserver.EMAIL_HOST_PASSWORD: the password for theSMTPserver.EMAIL_USE_: whether to use the Transport Layer Security (TLSTLS) secure connection.
For example, the following shows how to use Google SMTP server settings:
EMAIL_HOST = 'smtp.gmail.com'
EMAIL_HOST_PORT = 25
EMAIL_USE_TLS = True
EMAIL_HOST_USER = '[email protected]'
EMAIL_HOST_PASSWORD = 'your_gmail_password'Code language: Python (python)
Note that you should replace the EMAIL_HOST_USER and EMAIL_HOST_PASSWORD with your Gmail information.
If you don’t have a local SMTP server, you can use the following value in the settings.py file:
EMAIL_BACKEND = 'django.core.mail.backends.console.EmailBackend'Code language: Python (python)By using this setting, Django will output all emails to the console (Shell) instead of sending them. This is very convenient for testing without an SMTP Server:
EMAIL_BACKEND = 'django.core.mail.backends.console.EmailBackend'Code language: Python (python)A sample output will look like this:
Content-Type: text/plain; charset="utf-8"
MIME-Version: 1.0
Content-Transfer-Encoding: 8bit
Subject: Password reset on 127.0.0.1:8000
From: webmaster@localhost
To: [email protected]
Date: <date>
Message-ID:
 <[email protected]>


You're receiving this email because you requested a password reset for your user account at 127.0.0.1:8000.

Please go to the following page and choose a new password:

http://127.0.0.1:8000/password-reset-confirm/OA/bfwytu-b9f9b789e9a294eb80d707e448dde1d2/

Your username, in case you’ve forgotten: jane

Thanks for using our site!

The 127.0.0.1:8000 teamCode language: plaintext (plaintext)
If you want to customize the password reset email, you can create a password_reset_email.html in the templates/users directory:
<p>Hi</p>

<p>You're receiving this email because you requested a password reset for your user account at {{domain}}/</p>

<p>Please click the following link to reset your password:</p>

{{ protocol }}://{{ domain }}{% url "password_reset_confirm" uidb64=uid token=token %}

<p>Thanks</p>
<p>Todo App Team</p>
Code language: HTML, XML (xml)
And specify the html_email_template_name in the as_view() method of the PasswordResetView class:
path('password-reset/',
     PasswordResetView.as_view(
        template_name='users/password_reset.html',
        html_email_template_name='users/password_reset_email.html'
    ),
    name='password-reset'
)Code language: Python (python)
If you reset the password, Django will use the custom email template instead:
<p>Hi</p>

<p>You're receiving this email because you requested a password reset for your user account at 127.0.0.1:8000/</p>

<p>Please click the following link to reset your password:</p>

http://127.0.0.1:8000/password-reset-confirm/OA/bfwzqv-9d6b6777ad40073cfa1d4d4e150fb76f/

<p>Thanks</p>
<p>Todo App Team</p>Code language: Python (python)
You can download the Django password reset source code here.
Summary #
- Use
PasswordResetView,PasswordResetDoneView,PasswordResetConfirmView, andPasswordResetCompleteViewclasses to implement the password reset function for the Django application.