Summary: in this tutorial, you’ll learn how to use the Django LoginView to create a login page for the Todo App.
This tutorial begins where the Django DeleteView tutorial left off.
Django’s LoginView allows you to display the login form and process the login action. We’ll use the LoginView class to create a login page for the Todo App.
You can download the final code of this tutorial here.
Creating & configuring users app for the todo project #
The users app will have the following functionalities:
- Login / Logout
- Register
- Reset password
In this tutorial, we’ll focus on the Login / Logout functions.
First, use the startapp command to create the users app:
django-admin startapp usersCode language: Python (python)Next, register the users app in the settings.py of the project:
INSTALLED_APPS = [
    #...
    'users'
]Code language: Python (python)
Then, create urls.py in the users app with the following code:
from django.urls import path

urlpatterns = []Code language: Python (python)
After that, include the urls.pyusers app in the urls.py
from django.contrib import admin
from django.urls import path, include

urlpatterns = [
    path('admin/', admin.site.urls),
    path('',include('todo.urls')),
    path('',include('users.urls'))
]
Code language: Python (python)
Finally, create the templates directory, and users directory inside the templates directory in the users app to store the templates.
Creating a login page #
The following defines the My class in the LoginViewviews.py file that inherits from the LoginView class:
from django.contrib.auth.views import LoginView
from django.urls import reverse_lazy
from django.contrib import messages


class MyLoginView(LoginView):
    redirect_authenticated_user = True

    def get_success_url(self):
        return reverse_lazy('tasks')

    def form_invalid(self, form):
        messages.error(self.request,'Invalid username or password')
        return self.render_to_response(self.get_context_data(form=form))Code language: Python (python)
How it works.
First, import the LoginView from the django.contribauth.views, reverse_lazy from django.urls, and messages from django.contrib
from django.contrib.auth.views import LoginView
from django.urls import reverse_lazy
from django.contrib import messagesCode language: Python (python)
Second, define the My class that inherits from the LoginViewLoginView class. The My has the following attributes and methods:LoginView
redirect_authenticated_userTrueto instruct Django to redirect the users once they log in successfully. By default, theredirect_authenticated_userFalse, which turns off the redirection.get_success_url()returns the URL to redirect after the users log in successfully.form_invalid()form_invalid()
Defining a route for the login page #
Modify the views.py file to define a route for the login page:
from django.urls import path
from .views import MyLoginView

urlpatterns = [
    path('login/', MyLoginView.as_view(),name='login'),
]
Code language: Python (python)
How it works.
First, import the MyLoginView class from the views.py:
from .views import MyLoginViewCode language: Python (python)Second, map the login/ route to the result of as_view() method of the MyLoginView class.
urlpatterns = [
    path('login/', MyLoginView.as_view(),name='login'),
]Code language: Python (python)
Creating a login template #
First, create the login.html template in the templates/users directory with the following code:
{%extends 'base.html'%}

{%block content%}
  <div class="center">
	  <form method="post" class="card" novalidate>
	  	{% csrf_token %}
	    <h2 class="text-center">Log in to your account</h2>
		{% for field in form %}
	    		{{ field.label_tag }}
	        	{{ field }}
	        	{% if field.errors %}
	        		<small>{{ field.errors|striptags }}</small>
	        	{% endif %}
		{% endfor %}

		<input type="submit" value="Login" class="btn btn-primary full-width">
		<hr>
		<p class="text-center">Forgot your password <a href="#">Reset Password</a></p>
		<p class="text-center">Don't have a account? <a href="#">Join Now</a></p>
	</form>
</div>

{%endblock content%}Code language: HTML, XML (xml)
If you open the login URL:
http://127.0.0.1:8000/login/Code language: Python (python)you’ll see the following login form:
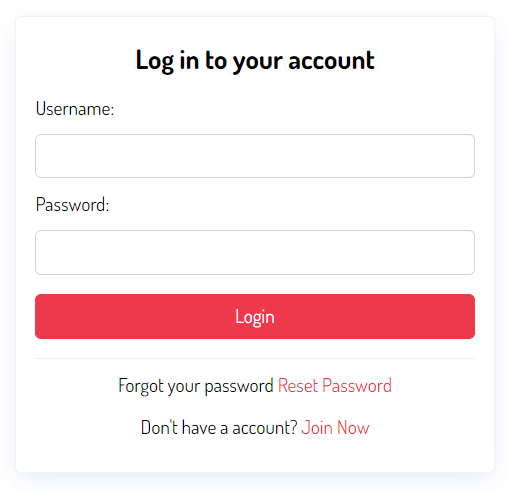
If you enter a valid username and password, you’ll log in successfully. Otherwise, you’ll get a message saying you have entered an invalid username or password.
Second, add the LOGIN_URL to the settings.py of the project:
LOGIN_URL = 'login'Code language: Python (python)If you attempt to access a page that requires login, Django will use this LOGIN_URLLOGIN_URLsettings.py, Django will use the default login URL which is accounts/login/.
Creating a logout URL #
The LogoutViewLogoutView
Unlike the LoginView class, you can use the LogoutView class directly in the urls.py. For example, you can modify the views.py to create a route for the logout URL:
from django.urls import path
from .views import MyLoginView
from django.contrib.auth.views import LogoutView

urlpatterns = [
    path('login/', MyLoginView.as_view(),name='login'),
    path('logout/', LogoutView.as_view(next_page='login'),name='logout'),
]Code language: Python (python)
How it works.
First, import the LogoutView from the django.contrib.auth.views:
from django.contrib.auth.views import LogoutViewCode language: Python (python)Second, map the URL logout/ with the result of the as_view() method of the LogoutView class. The next_page argument specifies the URL that the users will be redirected to once they log out successfully.
path('logout/', LogoutView.as_view(next_page='login'),name='logout')Code language: Python (python)Adding login/logout links to the header #
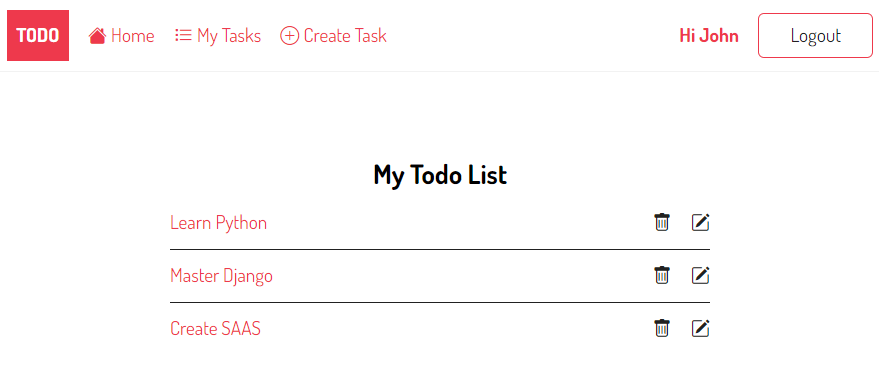
If the user logs in, the header shows the home, my tasks, new task, and logout link. Once the user logs out, the header displays the home, login, and join now links.
To achieve this, you modify the base.html template of the project as follows.
{%load static %}
<!DOCTYPE html>
<html lang="en">
    <head>
        <meta charset="UTF-8">
        <meta name="viewport" content="width=device-width, initial-scale=1.0">
        <link rel="stylesheet" href="{% static 'css/style.css' %}" />
        <title>Todo List</title>
    </head>
    <body>
        <header class="header">
            <div class="container">
            	<a href="{%url 'home'%}" class="logo">Todo</a>
            	<nav class="nav">
	            	<a href="{%url 'home'%}"><i class="bi bi-house-fill"></i> Home</a>
	                {% if request.user.is_authenticated %}
	    	              	<a href="{% url 'tasks' %}"><i class="bi bi-list-task"></i> My Tasks</a>
	    	              	<a href="{% url 'task-create' %}"><i class="bi bi-plus-circle"></i> Create Task</a>
		                	<a href="#">Hi {{request.user | title}}</a>
	    	                <a href="{% url 'logout' %}" class="btn btn-outline">Logout</a>
	                {% else %}
							<a href="{% url 'login' %}" class="btn btn-outline">Login</a>
	            	        <a href="#" class="btn btn-primary">Join Now</a>
	                {% endif %}
	              </nav>
            </div>
        </header>
        <main>
            <div class="container">
            	{% if messages %}
				{% for message in messages %}
					<div class="alert alert-{{message.tags}}">
					       {{message}}
					     </div>
					   {% endfor %}
				{% endif %}

             {%block content %}
             {%endblock content%}
            </div>
        </main>
        <footer class="footer">
            <div class="container">
				<p>© Copyright {% now "Y" %} by <a href="https://www.pythontutorial.net">Python Tutorial</a></p>
            </div>
        </footer>
    </body>
</html>
Code language: HTML, XML (xml)
Note that if the user logs in, the request.user.is_authenticated returns True. Therefore, you can use this property to check whether a user is logged or not.
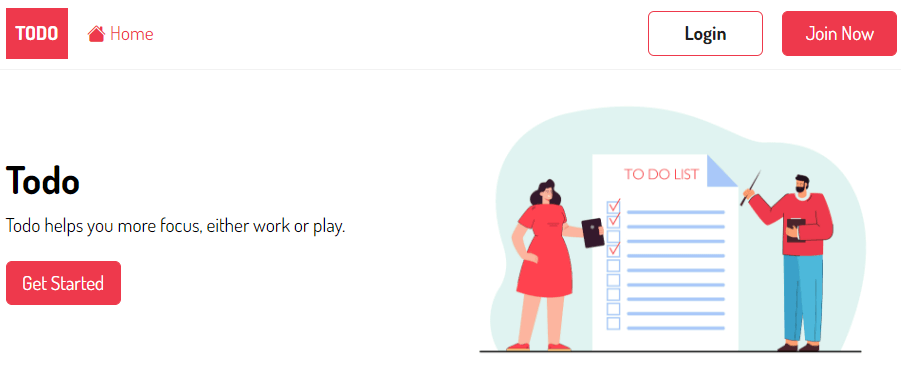
If you are not logged in, you’ll see the following links in the navigation:
However, if you log in, you’ll see the following navigation links:
LoginRequiredMixin #
Although you’re not logged in, you still can manage the task list such as viewing, adding, editing, and deleting the tasks. To protect these pages, you’ll use the LoginRequiredMixin class.
To do that, you modify the views.py of the todo application and use the LoginRequiredMixin class as follows:
from django.shortcuts import render
from django.views.generic.list import ListView
from django.views.generic.detail import DetailView
from django.views.generic.edit import CreateView, UpdateView, DeleteView
from django.contrib import messages
from django.urls import reverse_lazy
from django.contrib.auth.mixins import LoginRequiredMixin

from .models import Task

class TaskDelete(LoginRequiredMixin, DeleteView):
    model = Task
    context_object_name = 'task'
    success_url = reverse_lazy('tasks')

    def form_valid(self, form):
        messages.success(self.request, "The task was deleted successfully.")
        return super(TaskDelete,self).form_valid(form)


class TaskUpdate(LoginRequiredMixin, UpdateView):
    model = Task
    fields = ['title','description','completed']
    success_url = reverse_lazy('tasks')

    def form_valid(self, form):
        messages.success(self.request, "The task was updated successfully.")
        return super(TaskUpdate,self).form_valid(form)

class TaskCreate(LoginRequiredMixin, CreateView):
    model = Task
    fields = ['title','description','completed']
    success_url = reverse_lazy('tasks')


    def form_valid(self, form):
        form.instance.user = self.request.user
        messages.success(self.request, "The task was created successfully.")
        return super(TaskCreate,self).form_valid(form)

class TaskDetail(LoginRequiredMixin, DetailView):
    model = Task
    context_object_name = 'task'


class TaskList(LoginRequiredMixin,ListView):
    model = Task
    context_object_name = 'tasks'


def home(request):
    return render(request,'home.html')

Code language: Python (python)
If you have not logged in and attempted to access a protected page, Django will redirect you to the login page. For example:
http://127.0.0.1:8000/task/createCode language: Python (python)Django will redirect you to the login page using the LOGIN_URL configured in the settings.py:
http://127.0.0.1:8000/login/?next=/task/create/Code language: Python (python)Summary #
- Use the
LoginViewclass to create a login page. - Use the
LogoutViewclass to log a user out. - Use the
LoginRequiredMixinclass to protect a page.