Summary: in this tutorial, you’ll learn how to implement a user profile in Django applications.
This tutorial begins where the Django password reset tutorial left off.
A user profile consists of settings and information associated with a user. In this tutorial, you’ll learn how to allow users to update their profiles in Django applications.
Installing the pillow package #
Since we’ll deal with images, we need to install the pillow package by using the following pip command:
pip install PillowCode language: Python (python)Configuring the directory to store the uploaded images #
First, create a media directory in the project:
mkdir mediaCode language: Python (python)Second, add the MEDIA_ROOT and MEDIA_URL to the settings.py of the project:
MEDIA_ROOT = BASE_DIR / 'media'
MEDIA_URL = '/media/'Code language: Python (python)
The MEDIA_ROOTMEDIA_URL specifies the URL that serves the image files from the MEDIA_ROOT
Third, add the URL that serves the media files to the urls.py of the project as follows:
from django.contrib import admin
from django.urls import path, include

from django.conf import settings
from django.conf.urls.static import static

urlpatterns = [
    path('admin/', admin.site.urls),
    path('',include('todo.urls')),
    path('',include('users.urls'))
]

if settings.DEBUG:
    urlpatterns += static(settings.MEDIA_URL,
                          document_root=settings.MEDIA_ROOT)
Code language: Python (python)
If the DEBUG is True in the settings.py file, the Django app will serve the media files from MEDIA_URL.
Creating a profile model #
Modify the models.py of the users app and define the Profile model as follows:
from django.db import models
from django.contrib.auth.models import User
from PIL import Image


class Profile(models.Model):
    user = models.OneToOneField(User, on_delete=models.CASCADE)

    avatar = models.ImageField(
        default='avatar.jpg', # default avatar
        upload_to='profile_avatars' # dir to store the image
    )

    def __str__(self):
        return f'{self.user.username} Profile'

    def save(self, *args, **kwargs):
        # save the profile first
        super().save(*args, **kwargs)

        # resize the image
        img = Image.open(self.avatar.path)
        if img.height > 300 or img.width > 300:
            output_size = (300, 300)
            # create a thumbnail
            img.thumbnail(output_size)
            # overwrite the larger image
            img.save(self.avatar.path)Code language: Python (python)
How it works.
First, define the Profile model inherits from the Model class:
class Profile(models.Model):Code language: CSS (css)Second, each user has a profile and each profile belongs to a user. Therefore, the relationship between the User model and the Profile model is one-to-one.
To define the one-to-one relationship, you use the OneToOneField:
user = models.OneToOneField(User, on_delete=models.CASCADE)Code language: Python (python)If a User is deleted, the Profile associated with the User is also deleted. This indicates in the on_delete=models.CASCADE parameter of the OneToOneField().
Third, define the avatar field that holds the avatar of the user:
avatar = models.ImageField(
        default='avatar.jpg', # default avatar
        upload_to='profile_avatars' # dir to store the image
)Code language: Python (python)
If users haven’t uploaded avatars, the default one is avatar.jpg file. Also, we specify the directory (profile_avatars) that will store the uploaded avatars.
Note that you can add more fields to the Profile model like addresses, interests, etc., if needed.
Fourth, download the avatar.jpg file and copy it to the media directory of the project:
Fifth, define the __str__() method that returns a string representation of the Profile model:
def __str__(self):
   return f'{self.user.username} Profile'Code language: Python (python)
Sixth, define the save() method that saves the profile into the database, creates a thumbnail of the avatar, and stores it in the specified directory:
def save(self, *args, **kwargs):
    # save the profile first
    super().save(*args, **kwargs)

    # resize the image
    img = Image.open(self.avatar.path)
    if img.height > 150 or img.width > 150:
        output_size = (150, 150)
        # create a thumbnail
        img.thumbnail(output_size)

        # overwrite the large image
        img.save(self.avatar.path)Code language: Python (python)
Seventh, register the Profile in the admin.py so that we can manage the profile on the admin page:
from django.contrib import admin
from .models import Profile


admin.site.register(Profile)Code language: Python (python)
Applying the migrations #
First, make migrations by running the makemigrations command:
python manage.py makemigrationsCode language: Python (python)Output:
Migrations for 'users':
   users\migrations\0001_initial.py
      - Create model ProfileCode language: Python (python)
Second, apply the migrations:
python manage.py migrateCode language: Python (python)Output:
Operations to perform:
   Apply all migrations: admin, auth, contenttypes, sessions, todo, users
Running migrations:
   Applying users.0001_initial... OKCode language: Python (python)
Creating the MyProfile view #
Define a MyProfile class-based view in the views.py file:
from django.views import View

# ...

class MyProfile(LoginRequiredMixin, View):
    def get(self, request):
        user_form = UserUpdateForm(instance=request.user)
        profile_form = ProfileUpdateForm(instance=request.user.profile)

        context = {
            'user_form': user_form,
            'profile_form': profile_form
        }

        return render(request, 'users/profile.html', context)

    def post(self,request):
        user_form = UserUpdateForm(
            request.POST,
            instance=request.user
        )
        profile_form = ProfileUpdateForm(
            request.POST,
            request.FILES,
            instance=request.user.profile
        )

        if user_form.is_valid() and profile_form.is_valid():
            user_form.save()
            profile_form.save()

            messages.success(request,'Your profile has been updated successfully')

            return redirect('profile')
        else:
            context = {
                'user_form': user_form,
                'profile_form': profile_form
            }
            messages.error(request,'Error updating you profile')

            return render(request, 'users/profile.html', context)Code language: Python (python)
First, import the View class from django.views:
from django.views import ViewCode language: Python (python)Second, define MyViewView class. The MyViewget() and post() methods that correspond to the HTTP GET and POST.
By using the View class, you don’t need to have if-else branching inside a view function to determine whether the HTTP method is GET or POST.
In the get() method of the MyProfile class, we create the UserUpdateForm and ProfileUpdateForm objects and pass them to the profile.html template.
In the post() method, we also create the UserUpdateForm and ProfileUpdateForm objects but pass additional data from request.POST and request.FILES.
When both forms are valid, we save them into the database, create a flash message, and redirect the user back to the profile page.
If one of the forms is not valid, we create an error message and redirect the user back to the profile page, and rerender the template.
Creating profile.html template #
Create profile.html in the templates/users directory that extends the base.html template:
{% extends 'base.html' %}

{% block content %}


<div class="center">
	<form method="POST" enctype="multipart/form-data" class="card">
		{% csrf_token %}

	    {% if user.profile %}
			<img src="{{user.profile.avatar.url}}" alt="{{ user.username }}" class="avatar"  accept=".jpg,.jpeg,.png"/>
	    {% endif %}

	    <h2 class="text-center">{{ user.username | title }}</h2>
	    <p class="text-center"><a href="mailto:{{user.email}}">{{user.email}}</a></p>
   	    <hr>

            <label for="email">Email Address:</label>
            <input type="email" id="email" name="email" value="{{user.email}}" />


		<label for="avatar">Avatar:</label>
		<input type="file" name="avatar" id="avatar">

	    <button type="submit" class="btn btn-primary full-width">Update Profile</button>

	</form>
</div>

{% endblock content %}Code language: Python (python)
Manually creating a profile #
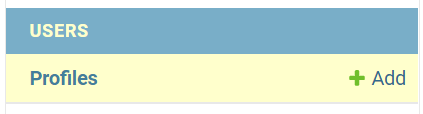
First, log in to the admin site using the superuser account, you’ll see the Profiles under the Users app:
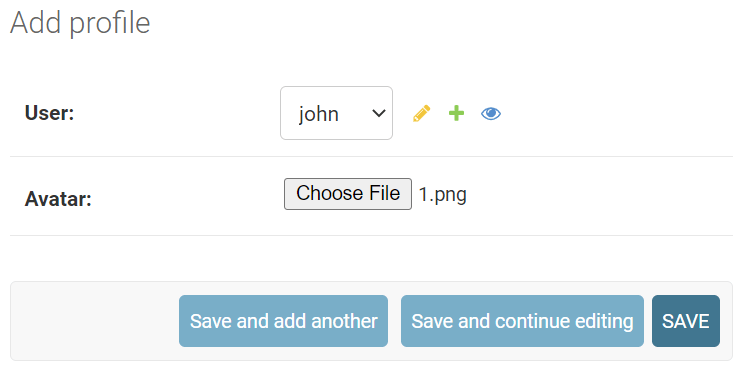
Second, click Add Profile button to create a new profile for the existing user:

Third, add a new profile for the user John and click the Save button:
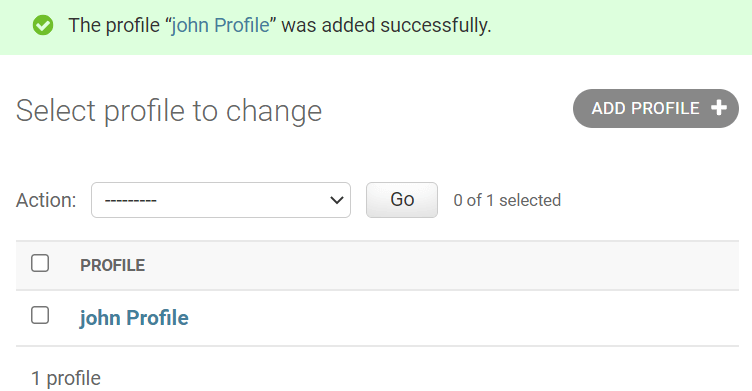
Django will show that the profile for the user John was added successfully.
If you log in as John and open the profile page http://127.0.0.1:8000/profile/, you’ll see the following page:
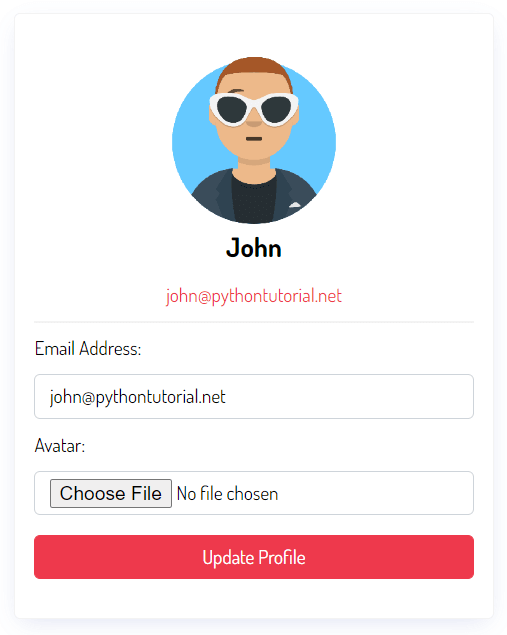
On this form, you can update a profile by changing the email address and uploading a new avatar.
Include the profile URL in the header #
Modify the base.html template to add the profile URL to the header:
{%load static %}
<!DOCTYPE html>
<html lang="en">

    <head>
        <meta charset="UTF-8">
        <meta name="viewport" content="width=device-width, initial-scale=1.0">
        <link rel="stylesheet" href="{% static 'css/style.css' %}" />
        <title>Todo List</title>
    </head>

    <body>
        <header class="header">
            <div class="container">
            	<a href="{%url 'home'%}" class="logo">Todo</a>
            	<nav class="nav">
	            	<a href="{%url 'home'%}"><i class="bi bi-house-fill"></i> Home</a>
	                {% if request.user.is_authenticated %}
	    	              	<a href="{% url 'tasks' %}"><i class="bi bi-list-task"></i> My Tasks</a>
	    	              	<a href="{% url 'task-create' %}"><i class="bi bi-plus-circle"></i> Create Task</a>
		                <a href="{% url 'profile' %}" title="Update my profile">Hi {{request.user | title}}</a>
	    	                <a href="{% url 'logout' %}" class="btn btn-outline">Logout</a>
	                {% else %}
				<a href="{% url 'login' %}" class="btn btn-outline">Login</a>
	            	        <a href="{% url 'register' %}" class="btn btn-primary">Join Now</a>
	                {% endif %}
	             </nav>
            </div>
        </header>
        <main>
            <div class="container">
            	{% if messages %}
				{% for message in messages %}
					<div class="alert alert-{{message.tags}}">
					       {{message}}
					     </div>
					   {% endfor %}
				{% endif %}

             {%block content %}
             {%endblock content%}
            </div>
        </main>
        <footer class="footer">
            <div class="container">
                <p>© Copyright {% now "Y" %} by <a href="https://www.pythontutorial.net">Python Tutorial</a></p>
            </div>
        </footer>
    </body>
</html>
Code language: HTML, XML (xml)
Creating profile automatically #
If you log in as Jane and access the profile page, you’ll get the following error:
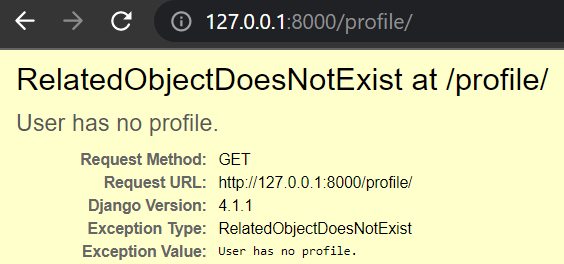
The reason is that we haven’t created the profile for the user Jane. To fix this issue, we should create a profile once a user registers successfully. To implement this, we’ll use something called signals in Django.
First, create signals.py file in the users app with the following code:
from django.db.models.signals import post_save
from django.contrib.auth.models import User
from django.dispatch import receiver
from .models import Profile


@receiver(post_save, sender=User)
def create_profile(sender, instance, created, **kwargs):
    if created:
        Profile.objects.create(user=instance)


@receiver(post_save, sender=User)
def save_profile(sender, instance, **kwargs):
    instance.profile.save()Code language: Python (python)
In this signals.py file:
- The
create_profile()function creates a new profile after aUserobject is created. - The
save_profile()function updates the profile after aUserobject is saved.
The @receiver decorator wires up the post_save event of the User model to each function.
Second, import signals to the apps.py file of the users app:
from django.apps import AppConfig


class UsersConfig(AppConfig):
    default_auto_field = 'django.db.models.BigAutoField'
    name = 'users'

    def ready(self):
        import users.signalsCode language: Python (python)
In the apps.py of the users app, we import the signals.py in the ready method of the UsersConfig class.
Third, register a new user and check the profile:
You can download the complete Django User Profile source code here.
Summary #
- Use the Django signal to create a profile for a user automatically.