Summary: in this tutorial, you’ll learn how to use the PyQt QTabWidget to create a tab widget.
Introduction to the PyQt QTabWidget #
Tabs allow you to display related information on separate labeled pages. Tabs are useful for dividing complex interfaces into smaller pages that are easier for users to digest.
To create a tab widget, you use the QTabWidgetQTabWidget
First, create the QTabWidget object:
tab = QTabWidget()
layout.addWidget(tab)Code language: Python (python)
Second, create a page by using the QWidgetQWidget
page = QWidget(tab)
page_layout = QGridLayout()
page.setLayout(page_layout)Code language: Python (python)
Third, add a page to the tab widget using the addTab() method:
tab.addTab(page,'Tab title')Code language: Python (python)Finally, repeat the second and third steps to add more pages to the tab.
PyQt QTabWidget example #
The following example illustrates how to create a tab widget with two pages:
import sys
from PyQt6.QtWidgets import QApplication, QWidget,  QFormLayout, QGridLayout, QTabWidget, QLineEdit, QDateEdit, QPushButton
from PyQt6.QtCore import Qt


class MainWindow(QWidget):
    def __init__(self, *args, **kwargs):
        super().__init__(*args, **kwargs)

        self.setWindowTitle('PyQt QTabWidget')

        main_layout = QGridLayout(self)
        self.setLayout(main_layout)

        # create a tab widget
        tab = QTabWidget(self)

        # personal page
        personal_page = QWidget(self)
        layout = QFormLayout()
        personal_page.setLayout(layout)
        layout.addRow('First Name:', QLineEdit(self))
        layout.addRow('Last Name:', QLineEdit(self))
        layout.addRow('DOB:', QDateEdit(self))

        # contact pane
        contact_page = QWidget(self)
        layout = QFormLayout()
        contact_page.setLayout(layout)
        layout.addRow('Phone Number:', QLineEdit(self))
        layout.addRow('Email Address:', QLineEdit(self))

        # add pane to the tab widget
        tab.addTab(personal_page, 'Personal Info')
        tab.addTab(contact_page, 'Contact Info')

        main_layout.addWidget(tab, 0, 0, 2, 1)
        main_layout.addWidget(QPushButton('Save'), 2, 0,
                              alignment=Qt.AlignmentFlag.AlignLeft)
        main_layout.addWidget(QPushButton('Cancel'), 2, 0,
                              alignment=Qt.AlignmentFlag.AlignRight)

        self.show()


if __name__ == '__main__':
    app = QApplication(sys.argv)
    window = MainWindow()
    sys.exit(app.exec())Code language: Python (python)
Output:
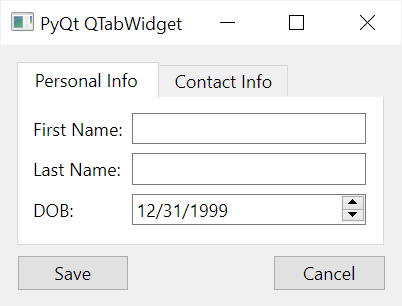
How it works. (We’ll focus on the tab widget construction only)
First, create a tab widget:
tab = QTabWidget(self)Code language: Python (python)Next, create a page using the QWidget and set its layout to a QFormLayout:
personal_page = QWidget(self)
layout = QFormLayout()
personal_page.setLayout(layout)Code language: Python (python)
Then, add QLineEdit widgets to the person_page widget:
layout.addRow('First Name:', QLineEdit(self))
layout.addRow('Last Name:', QLineEdit(self))
layout.addRow('DOB:', QDateEdit(self))Code language: Python (python)
After that, create a new page that holds the fields for contact information:
contact_page = QWidget(self)
layout = QFormLayout()
contact_page.setLayout(layout)
layout.addRow('Phone Number:', QLineEdit(self))
layout.addRow('Email Address:', QLineEdit(self))Code language: Python (python)
Finally, add pages to the tab using the add_tab() method:
tab.addTab(personal_page, 'Personal Info')
tab.addTab(contact_page, 'Contact Info')Code language: Python (python)
QTabWidget options #
The QTabWidget has some notable options.
Movable #
To make the tab movable, you set the movable property to True:
tab = QTabWidget(self,movable=True)Code language: Python (python)Note that you can initialize the movable property when creating the tab widget.
Or you can use the setMovable() method of the tab widget object:
tab.setMovable(True)Code language: Python (python)tabsClosable #
If the tabsClosble is true, the tabs will display a close button on tabs.
tab = QTabWidget(self,tabsClosable=True)Code language: Python (python)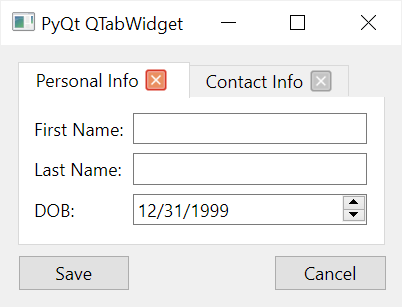
Or you can use the setTabsClosable() method:
tab.setTabsClosable(True)Code language: Python (python)When the close button is clicked, the QTabWidget emits the tabCloseRequested signal. If you want to close the tab, you need to connect to this signal and implement the code to close the corresponding tab.
Tab shape #
The tab has two shapes rounded & triangular. The rounded is the default.
To set the tab shape, you can use the tabShape argument when creating a new tab widget:
tab = QTabWidget(self, tabShape=QTabWidget.TabShape.Triangular)Code language: Python (python)Or you can use the setTabShape() method:
tab.setTabShape(QTabWidget.TabShape.Triangular)Code language: Python (python)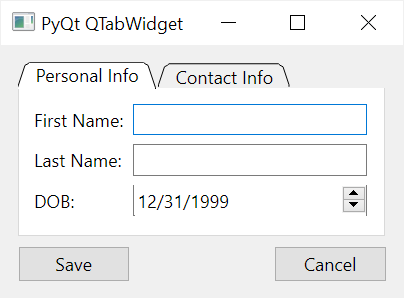
Tab positions #
Tabs can have four positions determined by the TabPosition enum:
- North
- South
- West
- East
To set the tab position, you can use the tabPosition argument when creating the tab widget:
tab = QTabWidget(self, tabPosition=QTabWidget.TabPosition.West)Code language: Python (python)Or you can use the setTabPosition() method:
tab.setTabPosition(QTabWidget.TabPosition.West)Code language: Python (python)Summary #
- Use the
QTabWidgetto create a tab widget. - Tabs can be movable, closable, and have different positions.