Summary: in this tutorial, you’ll learn how to use the QTableWidget class to create a table widget.
Introduction to PyQt QTableWidget class #
The QTableWidgetQTableWidgetQTableWidget
The following creates a table widget using the QTableWidget class:
table = QTableWidget(parent)Code language: Python (python)The parent is the parent widget or the main window.
Once having a QTableWidget object, you can set the number of columns for the table using the setColumnCount() method:
table.setColumnCount(columns)Code language: Python (python)To set the horizontal labels for the table columns, you use the setHorizontalHeaderLabels() method:
table.setHorizontalHeaderLabels(labels)Code language: Python (python)Each column has an index starting from zero. For each column, you can configure its width using the setColumnWidth() method:
table.setColumnWidth(column, width)Code language: Python (python)To set the number of rows for the table, you use the setRowCount() method:
table.setRowCount(rows)Code language: Python (python)If you know the number of rows and columns that the table may have at the time of creation, you can use the following:
table = QTableWidget(rows, columns, parent)Code language: PHP (php)To add an item to the table, you use the setItem() method:
table.setItem(row, column, item)Code language: Python (python)PyQt QTableWidget example #
We’ll develop an application that uses a QTableWidget to manage employee data:
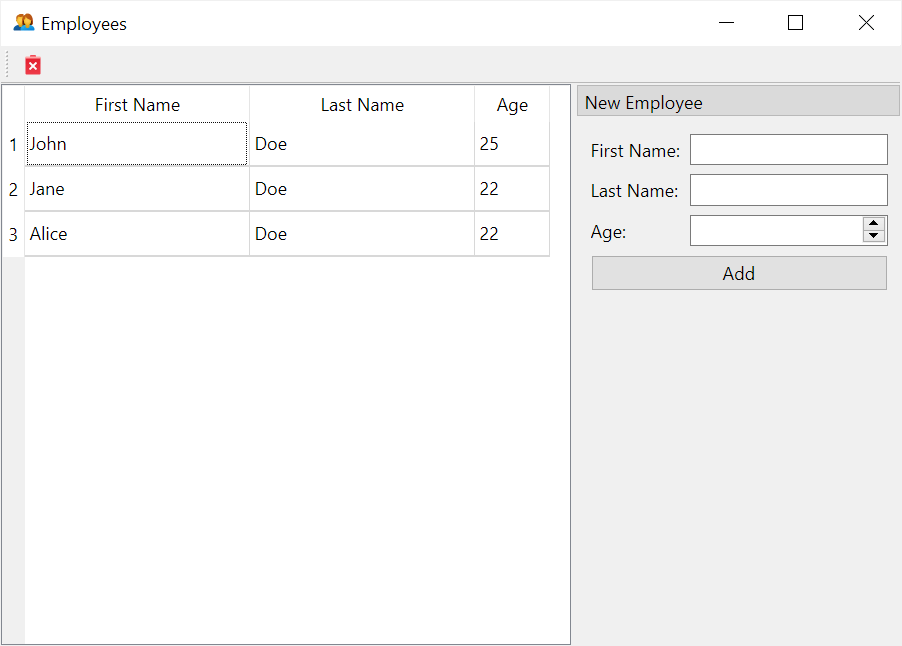
If you enter the first name, last name, and age and click add, the program will add the new employee to the table. Also, if you select a row and click the delete icon, the table will delete the row.
Here’s the complete program:
import sys
from PyQt6.QtWidgets import (
    QApplication, QMainWindow, QTableWidget,
    QTableWidgetItem, QDockWidget, QFormLayout,
    QLineEdit, QWidget, QPushButton, QSpinBox,
    QMessageBox, QToolBar, QMessageBox
)
from PyQt6.QtCore import Qt,QSize
from PyQt6.QtGui import QIcon, QAction


class MainWindow(QMainWindow):
    def __init__(self, *args, **kwargs):
        super().__init__(*args, **kwargs)
        self.setWindowTitle('Employees')
        self.setWindowIcon(QIcon('./assets/usergroup.png'))
        self.setGeometry(100, 100, 600, 400)

        employees = [
            {'First Name': 'John', 'Last Name': 'Doe', 'Age': 25},
            {'First Name': 'Jane', 'Last Name': 'Doe', 'Age': 22},
            {'First Name': 'Alice', 'Last Name': 'Doe', 'Age': 22},
        ]

        self.table = QTableWidget(self)
        self.setCentralWidget(self.table)

        self.table.setColumnCount(3)
        self.table.setColumnWidth(0, 150)
        self.table.setColumnWidth(1, 150)
        self.table.setColumnWidth(2, 50)

        self.table.setHorizontalHeaderLabels(employees[0].keys())
        self.table.setRowCount(len(employees))

        row = 0
        for e in employees:
            self.table.setItem(row, 0, QTableWidgetItem(e['First Name']))
            self.table.setItem(row, 1, QTableWidgetItem(e['Last Name']))
            self.table.setItem(row, 2, QTableWidgetItem(str(e['Age'])))
            row += 1

        dock = QDockWidget('New Employee')
        dock.setFeatures(QDockWidget.DockWidgetFeature.NoDockWidgetFeatures)
        self.addDockWidget(Qt.DockWidgetArea.RightDockWidgetArea, dock)

        # create form
        form = QWidget()
        layout = QFormLayout(form)
        form.setLayout(layout)


        self.first_name = QLineEdit(form)
        self.last_name = QLineEdit(form)
        self.age = QSpinBox(form, minimum=18, maximum=67)
        self.age.clear()

        layout.addRow('First Name:', self.first_name)
        layout.addRow('Last Name:', self.last_name)
        layout.addRow('Age:', self.age)

        btn_add = QPushButton('Add')
        btn_add.clicked.connect(self.add_employee)
        layout.addRow(btn_add)

        # add delete & edit button
        toolbar = QToolBar('main toolbar')
        toolbar.setIconSize(QSize(16,16))
        self.addToolBar(toolbar)


        delete_action = QAction(QIcon('./assets/remove.png'), '&Delete', self)
        delete_action.triggered.connect(self.delete)
        toolbar.addAction(delete_action)
        dock.setWidget(form)


    def delete(self):
        current_row = self.table.currentRow()
        if current_row < 0:
            return QMessageBox.warning(self, 'Warning','Please select a record to delete')

        button = QMessageBox.question(
            self,
            'Confirmation',
            'Are you sure that you want to delete the selected row?',
            QMessageBox.StandardButton.Yes |
            QMessageBox.StandardButton.No
        )
        if button == QMessageBox.StandardButton.Yes:
            self.table.removeRow(current_row)

    def valid(self):
        first_name = self.first_name.text().strip()
        last_name = self.last_name.text().strip()


        if not first_name:
            QMessageBox.critical(self, 'Error', 'Please enter the first name')
            self.first_name.setFocus()
            return False

        if not last_name:
            QMessageBox.critical(self, 'Error', 'Please enter the last name')
            self.last_name.setFocus()
            return False

        try:
            age = int(self.age.text().strip())
        except ValueError:
            QMessageBox.critical(self, 'Error', 'Please enter a valid age')
            self.age.setFocus()
            return False

        if age <= 0 or age >= 67:
            QMessageBox.critical(
                self, 'Error', 'The valid age is between 1 and 67')
            return False

        return True

    def reset(self):
        self.first_name.clear()
        self.last_name.clear()
        self.age.clear()

    def add_employee(self):
        if not self.valid():
            return

        row = self.table.rowCount()
        self.table.insertRow(row)
        self.table.setItem(row, 0, QTableWidgetItem(
            self.first_name.text().strip())
        )
        self.table.setItem(
            row, 1, QTableWidgetItem(self.last_name.text())
        )
        self.table.setItem(
            row, 2, QTableWidgetItem(self.age.text())
        )

        self.reset()


if __name__ == '__main__':
    app = QApplication(sys.argv)
    window = MainWindow()
    window.show()
    sys.exit(app.exec())Code language: Python (python)
How it works.
First, initialize an employee list as a list of dictionaries:
employees = [
    {'First Name': 'John', 'Last Name': 'Doe', 'Age': 25},
    {'First Name': 'Jane', 'Last Name': 'Doe', 'Age': 22},
    {'First Name': 'Alice', 'Last Name': 'Doe', 'Age': 22},
]Code language: Python (python)
Second, create a new QTableWidget and set it as the central widget of the main window:
self.table = QTableWidget(self)
self.setCentralWidget(self.table)Code language: Python (python)
Third, set the number of columns for the table and configure the columns’ width:
self.table.setColumnCount(3)
self.table.setColumnWidth(0, 150)
self.table.setColumnWidth(1, 150)
self.table.setColumnWidth(2, 50)Code language: Python (python)
Fourth, set the horizontal headers for the table:
self.table.setHorizontalHeaderLabels(employees[0].keys())Code language: Python (python)Fifth, set the row count as the number of items in the employees list:
self.table.setRowCount(len(employees))Code language: Python (python)Sixth, add each employee from the employees to the table:
row = 0
for e in employees:
    self.table.setItem(row, 0, QTableWidgetItem(e['First Name']))
    self.table.setItem(row, 1, QTableWidgetItem(e['Last Name']))
    self.table.setItem(row, 2, QTableWidgetItem(str(e['Age'])))
    row += 1   Code language: Python (python)
Seventh, define the delete() method that executes when the user selects a row and clicks the delete button on the toolbar:
def delete(self):
    current_row = self.table.currentRow()
    if current_row < 0:
        return QMessageBox.warning(self, 'Warning','Please select a record to delete')

    button = QMessageBox.question(
        self,
        'Confirmation',
        'Are you sure that you want to delete the selected row?',
        QMessageBox.StandardButton.Yes |
        QMessageBox.StandardButton.No
    )
    if button == QMessageBox.StandardButton.Yes:
        self.table.removeRow(current_row)Code language: Python (python)
The currenRow() method returns the currently selected row. It returns -1 if no row is selected. In this case, we use the QMessageBox to issue a warning message.
If the user selects a row, we use the QMessageBox to raise a question to confirm the deletion. If the user clicks OK, we use the removeRow() method of the QTableWidget to delete the selected row.
Eight, define the add_employee() method to add a new employee to the table:
def add_employee(self):
    if not self.valid():
        return
    row = self.table.rowCount()
    self.table.insertRow(row)
    self.table.setItem(row, 0, QTableWidgetItem(self.first_name.text().strip()))
    self.table.setItem(row, 1, QTableWidgetItem(self.last_name.text()))
    self.table.setItem(row, 2, QTableWidgetItem(self.age.text()))
    self.reset()Code language: Python (python)
The add_employee() method does the following:
- Validate the employee using the
valid()method. - Append a new row to the table using the
insertRow()method. - Set the item for each column of the newly inserted row. using the
setItem()method. - Reset the employee form using the
reset()method.
Summary #
- Use the
QTableWidgetclass to create a table widget. - Use the
setColumnCount()andsetRowCount()methods to set the columns and rows for the table. - Use the
setHorizontalHeaderLabels()method to set the horizontal headers for the table. - Use the
QTableWidgetItemclass to create a table item. - Use the
setItem()method to set an item for the table. - Use the
currentRow()method to get the currently selected row. - Use the
insertRow()method to insert a new row into the table. - Use the
deleteRow()method to delete a row from the table.