Summary: in this tutorial, you’ll learn how to create a Django delete form to delete a post.
This tutorial begins where creating Django edit form tutorial left off.
We’ll create a form that deletes a post by its id.
Creating an URL pattern #
Add an URL pattern to the pattern list in the urls.py of the blog application:
from django.urls import path
from . import views

urlpatterns = [
    path('', views.home, name='posts'),
    path('post/create', views.create_post, name='post-create'),
    path('post/edit/<int:id>/', views.edit_post, name='post-edit'),
    path('post/delete/<int:id>/', views.delete_post, name='post-delete'),
    path('about/', views.about, name='about'),
]
Code language: Python (python)
The delete URL accepts an id as an integer that specifies the id of the post to be deleted. When you open the URL:
http://127.0.0.1/post/delete/1/Code language: Python (python)Django will execute the delete_post() function in the views.py.
Defining a view function #
Define a delete_post() function in the views.py of the blog application:
from django.shortcuts import render,redirect, get_object_or_404
from django.contrib import messages
from .models import Post
from .forms import PostForm


def delete_post(request, id):
    post = get_object_or_404(Post, pk=id)
    context = {'post': post}

    if request.method == 'GET':
        return render(request, 'blog/post_confirm_delete.html',context)
    elif request.method == 'POST':
        post.delete()
        messages.success(request,  'The post has been deleted successfully.')
        return redirect('posts')

# ...Code language: Python (python)
How it works.
- First, get the post by id using the
get_object_or_404()and render thepost_confirm_delete.htmltemplate. If the post doesn’t exist, then redirects to a 404 page. - Second, render the
post_confirm_delete.htmltemplate if the HTTP request is GET. - Third, delete the post, create a flash message, and redirect to the post list if the HTTP request is POST.
Creating a template #
Create the post_confirm_delete.html template in the templates/blog directory of the blog application. This template extends the base.html template of the project:
{% extends 'base.html' %}

{% block content %}
<h2>Delete Post</h2>

<form method="POST">
  {% csrf_token %}
  <p>Are you sure that you want to delete the post "{{post.title}}"?</p>
  <div>
    <button type="submit">Yes, Delete</button>
    <a href="{% url 'posts' %}">Cancel</a>
  </div>
</form>

{% endblock content %}Code language: HTML, XML (xml)
This template contains a form that has two buttons. If you click the submit button (Yes, Delete) it’ll send an HTTP POST request to the specified URL. Otherwise, it’ll navigate to the post list URL.
Adding the delete link to the post #
Add the delete link to each post in the home.html template:
{% extends 'base.html' %}
{% block content %}
<h1>My Posts</h1>
{% for post in posts %}
<h2>{{ post.title }}</h2>
<small>Published on {{ post.published_at | date:"M d, Y" }} by {{ post.author | title}}</small>
<p>{{ post.content }}</p>
<p>
<a href="{% url 'post-edit' post.id %}">Edit</a>
<a href="{% url 'post-delete' post.id%}">Delete</a>
</p>
{% endfor %}
{% endblock content %}
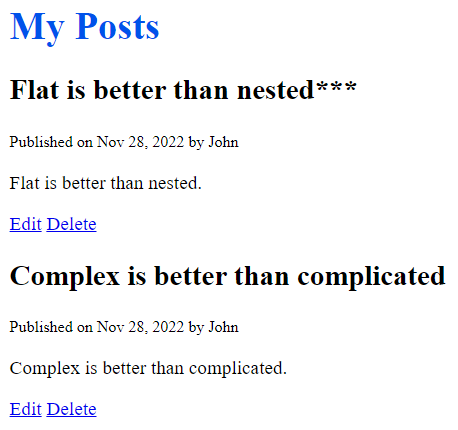
Code language: HTML, XML (xml)If you open the URL http://127.0.0.1/, you’ll see the delete link that appears next to the edit link:
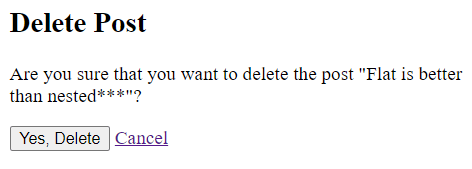
If you click the delete link, you’ll navigate to the delete URL. For example, the following shows the page when deleting the post with the title "Flat is better than nested***":
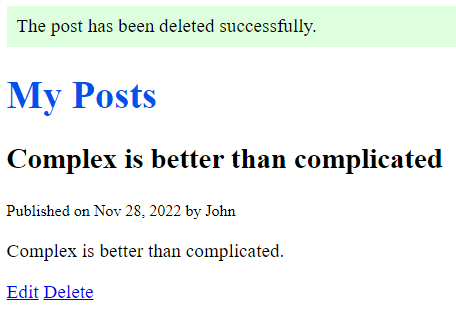
Once you click the Yes, Delete button, Django will execute the delete_post() function that deletes the post and redirects you to the post list:
Download the Django Project source code
Summary #
- Use the
delete()method to delete a model from the database.