Summary: in this tutorial, you’ll learn about the Tkinter Treeview widget and how to use it to display hierarchical and tabular data.
Introduction to the Tkinter Treeview widget #
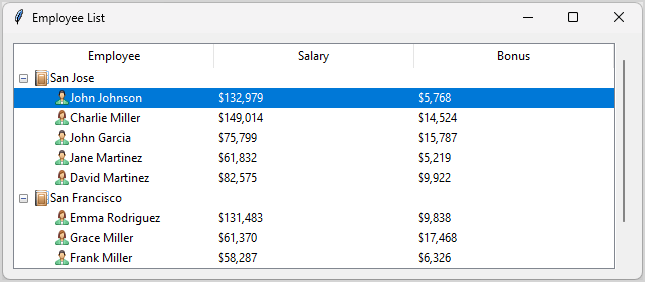
A Treeview widget allows you to display hierarchical collection of items. Each item has a label, an optional icon, and an optional list of data values. A Treeview widget displays data values in successive columns after the tree label.
For example, the following picture shows how to use a Treeview to display employees by cities:
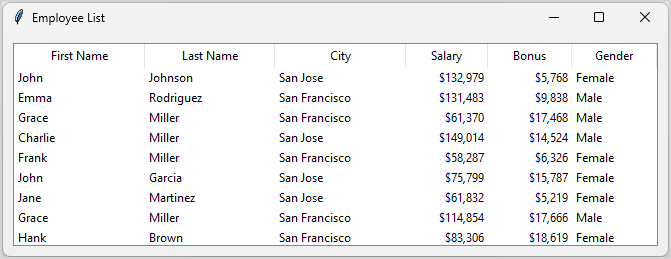
Additionally, you can use a Treeview widget to display the same employee list as a table:
The Treeview widget allows both horizontal and vertical scrollbars.
Creating a Treeview #
To create a Treeview widget, you follow these steps:
First, import ttk module from tkinter:
from tkinter import ttkCode language: Python (python)Second, create a tree view using the Treeview constructor:
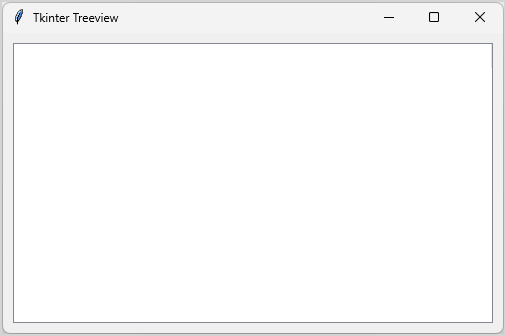
treeview = ttk.Treeview(master=None, **kw)Code language: Python (python)For example, the following program creates an empty Treeview:
import tkinter as tk
from tkinter import ttk

root = tk.Tk()
root.title("Tkinter Treeview")
root.geometry("500x300")

treeview = ttk.Treeview()

treeview.pack(padx=10,pady=10, expand=True, fill=tk.BOTH)

root.mainloop()Code language: Python (python)
Output:
Adding items to a Treeview #
You can add an item to a tree view by using the insert() method of the Treeview object. For example, the following program adds an item (San Jose) to the Treeview:
import tkinter as tk
from tkinter import ttk

root = tk.Tk()
root.geometry("400x300")
root.title("Tkinter Treeview")

treeview = ttk.Treeview()
level1 = treeview.insert("", tk.END, text="San Jose")

treeview.pack(fill=tk.BOTH, expand=True, padx=10, pady=10)
root.mainloop()Code language: Python (python)
Output:

In this example, we add an item with label (San Jose) to the Treeview using the following insert() method:
level1 = treeview.insert("", tk.END, text="San Jose")Code language: Python (python)The insert() method accepts three arguments:
- An empty string
""indicates that the new item is a parent item. tk.ENDinstructs theTreeviewwidget to place the item at the end of the tree.text="San Jose"specifies the label of the item.
The insert() method creates a new item, inserts it into the tree view widget, and returns the item’s ID (level1).
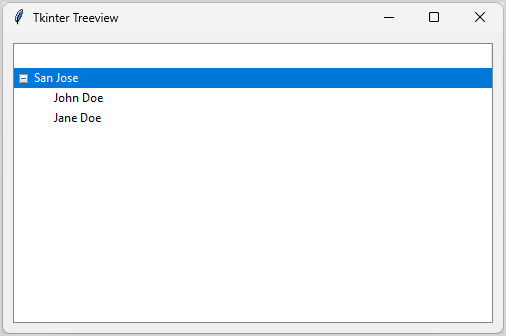
To add a sub item of an item, you also use the insert() method:
import tkinter as tk
from tkinter import ttk

root = tk.Tk()
root.geometry("400x300")
root.title("Tkinter Treeview")

treeview = ttk.Treeview()
level1 = treeview.insert("", tk.END, text="San Jose")
treeview.insert(level1, tk.END, text="John Doe")
treeview.insert(level1, tk.END, text="Jane Doe")

treeview.pack(fill=tk.BOTH, expand=True, padx=10, pady=10)
root.mainloop()Code language: Python (python)
Output:
How it works:
First, insert an item and return the item’s id:
level1 = treeview.insert("", tk.END, text="San Jose")Code language: Python (python)Second, insert two subitems under the item:
treeview.insert(level1, tk.END, text="John Doe")
treeview.insert(level1, tk.END, text="Jane Doe")Code language: Python (python)
In this example, we use the level1 as the id of the parent item.
Creating columns #
An item can have one or more columns. To add the heading for the column, you pass the column names to the Treeview constructor:
import tkinter as tk
from tkinter import ttk

root = tk.Tk()

root.title("Tkinter Treeview")

treeview = ttk.Treeview(columns=("Salary","Bonus"))

treeview.heading("#0", text="Employee")
treeview.heading("Salary", text="Salary")
treeview.heading("Bonus", text="Bonus")

level1 = treeview.insert('', tk.END, text="San Jose")


treeview.insert(level1, tk.END, text="John Doe", values=(f"${100000: ,}",f"${8000: ,}"))
treeview.insert(level1, tk.END, text="Jane Doe", values=(f"${120000: ,}",f"${9000: ,}"))

treeview.pack(fill=tk.BOTH, expand=True, padx=10, pady=10)

root.mainloop()Code language: Python (python)
Output:
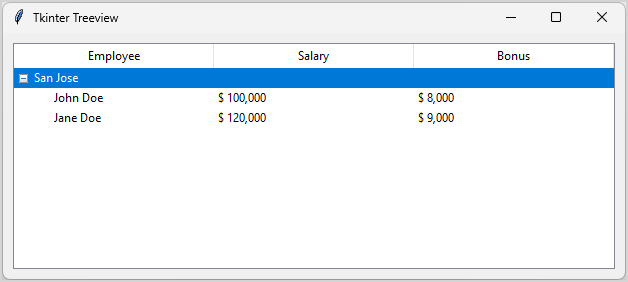
How it works.
First, create a treeview with two extra columns besides the default one. The default column is '#0'.
treeview = ttk.Treeview(columns=("Salary","Bonus"))Code language: Python (python)Second, set header text for each column:
treeview.heading("#0", text="Employee")
treeview.heading("Salary", text="Salary")
treeview.heading("Bonus", text="Bonus")Code language: Python (python)
The '#0' refers to the first column.
Third, insert a top-level node:
level1 = treeview.insert('', tk.END, text="San Jose")Code language: Python (python)The empty string ('') is the root-level item and text="San Jose" is the label of the '#0' column. The level1 is the id of the tree node that we’ll use to insert subitems under it.
Finally, add two subitems as the children of the "San Jose" node; format the number with comma to make the amounts easier to read:
treeview.insert(level1, tk.END, text="John Doe", values=(f"${100000: ,}", f"${8000: ,}"))
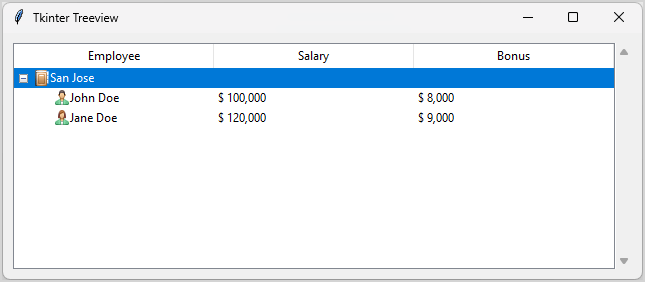
treeview.insert(level1, tk.END, text="Jane Doe", values=(f"${120000: ,}", f"${9000: ,}"))Code language: Python (python)Adding Icons #
To add an icon to an item, you follow these steps:
First, create a PhotoImage object:
icon = tk.PhotoImage(file='icon.png')Code language: Python (python)Second, pass the icon to the image parameter of the insert() method:
treeview.insert(..., image=icon)Code language: Python (python)Before running the following program, you can download the icon file and extract it to the same directory of the main.py file.
The following program shows how to add icons to the items of the Treeview:
import tkinter as tk
from tkinter import ttk

root = tk.Tk()

root.title("Tkinter Treeview")

treeview = ttk.Treeview(columns=( "Salary","Bonus"))

treeview.heading("#0", text="Employee")
treeview.heading("Salary", text="Salary")
treeview.heading("Bonus", text="Bonus")


icon_city = tk.PhotoImage(file="./assets/city.png")
icon_male = tk.PhotoImage(file="./assets/male.png")
icon_female= tk.PhotoImage(file="./assets/female.png")

level1 = treeview.insert('', tk.END, text="San Jose", image=icon_city)
treeview.insert(level1, tk.END, text="John Doe", values=(f"${100000: ,}",f"${8000: ,}"), image=icon_male)
treeview.insert(level1, tk.END, text="Jane Doe", values=(f"${120000: ,}",f"${9000: ,}"), image=icon_female)

treeview.pack(fill=tk.BOTH, expand=True, padx=10, pady=10)

root.mainloop()Code language: Python (python)
Output:
How it works.
First, create three PhotoImage object:
icon_city = tk.PhotoImage(file="./assets/city.png")
icon_male = tk.PhotoImage(file="./assets/male.png")
icon_female= tk.PhotoImage(file="./assets/female.png")Code language: Python (python)
Second, assign each of them to the item when inserting into the Treeview widget:
level1 = treeview.insert('', tk.END, text="San Jose", image=icon_city)
treeview.insert(level1, tk.END, text="John Doe", values=(f"${100000: ,}",f"${8000: ,}"), image=icon_male)
treeview.insert(level1, tk.END, text="Jane Doe", values=(f"${120000: ,}",f"${9000: ,}"), image=icon_female)Code language: Python (python)
Adding a scrollbar to the Treeview widget #
The following program shows how to add a scrollbar to a tree view:
import tkinter as tk
from tkinter import ttk

root = tk.Tk()
root.title("Tkinter Treeview")

frame = ttk.Frame(root)

# create a treeview widget
treeview = ttk.Treeview(frame, columns=( "Salary","Bonus"))

treeview.heading("#0", text="Employee")
treeview.heading("Salary", text="Salary")
treeview.heading("Bonus", text="Bonus")


icon_city = tk.PhotoImage(file="./assets/city.png")
level1 = treeview.insert('', tk.END, text="San Jose", image=icon_city)


icon_male = tk.PhotoImage(file="./assets/male.png")
icon_female= tk.PhotoImage(file="./assets/female.png")


treeview.insert(level1, tk.END, text="John Doe", values=(f"${100000: ,}",f"${8000: ,}"), image=icon_male)
treeview.insert(level1, tk.END, text="Jane Doe", values=(f"${120000: ,}",f"${9000: ,}"), image=icon_female)

# create a vertical scrollbar
v_scrollbar = ttk.Scrollbar(frame, orient=tk.VERTICAL, command=treeview.yview)
treeview.configure(yscrollcommand=v_scrollbar.set)

# pack the treeview and scrollbar
treeview.pack(side=tk.LEFT, fill=tk.BOTH, expand=True)
v_scrollbar.pack(side=tk.RIGHT, fill=tk.Y)

# package the frame
frame.pack(fill=tk.BOTH, expand=True, padx=10, pady=10)


root.mainloop()Code language: Python (python)
Output:
How it works:
First, create a vertial scrollback and link it with the TreeView widget:
v_scrollbar = ttk.Scrollbar(frame, orient=tk.VERTICAL, command=treeview.yview)
treeview.configure(yscrollcommand=v_scrollbar.set)Code language: Python (python)
Second, pack the scrollback on the same frame of the TreeView widget:
v_scrollbar.pack(side=tk.RIGHT, fill=tk.Y)Code language: Python (python)Loading data from CSV file and display it on a Treeview widget #
The following example shows how to read data from a csv file (employee.csv) and show it on a Treeview widget:
import tkinter as tk
from tkinter import ttk
import csv


def read_csv(filename):
    rows = []
    with open(filename, newline='') as file:
        reader = csv.DictReader(file)
        for row in reader:
            rows.append(row)

    return rows

def prepare_tree_data(rows, icon_male, icon_female):
    grouped_data = {}
    for row in rows:
        if row['Gender'] == 'Male':
            row['Icon']= icon_male
        else:
            row['Icon']= icon_female

        city = row['City']  # Assuming city is in the 5th column
        if city not in grouped_data:
            grouped_data[city] = []
        grouped_data[city].append(row)
    return grouped_data


def format_currency(value):
    try:
        return f"${int(value):,}"
    except ValueError:
        return value


def create_tree_view(root, employees, icons):

    frame = ttk.Frame(root)

    treeview = ttk.Treeview(frame, columns=( "Salary","Bonus"))

    treeview.heading("#0", text="Employee")
    treeview.heading("Salary", text="Salary")
    treeview.heading("Bonus", text="Bonus")


    employee_data = prepare_tree_data(employees, icons['female'], icons['male'])

    for city in employee_data.keys():
        # add city
        city_id = treeview.insert('', tk.END, text=city, image=icons['city'])

        # add employees in the city
        for employee in employee_data[city]:
            treeview.insert(
                city_id,
                tk.END,
                text=employee['First Name'] + ' ' + employee['Last Name'],
                values=(format_currency(employee['Salary']), format_currency(employee['Bonus'])),
                image=employee['Icon']
            )
    # create a vertical scrollbar
    v_scrollbar = ttk.Scrollbar(frame, orient=tk.VERTICAL, command=treeview.yview)
    treeview.configure(yscrollcommand=v_scrollbar.set)

    # pack the treeview and scrollbar
    treeview.pack(side=tk.LEFT, fill=tk.BOTH, expand=True)
    v_scrollbar.pack(side=tk.RIGHT, fill=tk.Y)

    # package the frame
    frame.pack(fill=tk.BOTH, expand=True, padx=10, pady=10)


def main():
    root = tk.Tk()
    root.title("Employee List")

    icons = {
        'city': tk.PhotoImage(file="./assets/city.png"),
        'male': tk.PhotoImage(file="./assets/male.png"),
        'female': tk.PhotoImage(file="./assets/female.png"),

    }

    employees = read_csv('employees.csv')
    create_tree_view(root, employees, icons)

    root.mainloop()


if __name__ == '__main__':
    main()Code language: Python (python)
Output:
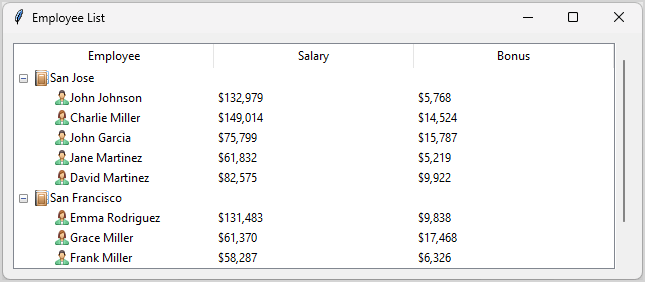
How it works.
First, read data from the a csv file using built-in csv module and return a list of employees:
def read_csv(filename):
    rows = []
    with open(filename, newline='') as file:
        reader = csv.DictReader(file)
        for row in reader:
            rows.append(row)

    return rowsCode language: Python (python)
Second, group employees by cities and assign the icon based on employee’s gender:
def prepare_tree_data(rows, icon_male, icon_female):
    grouped_data = {}
    for row in rows:
        if row['Gender'] == 'Male':
            row['Icon']= icon_male
        else:
            row['Icon']= icon_female

        city = row['City']  # Assuming city is in the 5th column
        if city not in grouped_data:
            grouped_data[city] = []
        grouped_data[city].append(row)
    return grouped_dataCode language: Python (python)
Third, define a function to format currency:
def format_currency(value):
    try:
        return f"${int(value):,}"
    except ValueError:
        return valueCode language: Python (python)
Fourth, create the Treeview widget and add employees to it:
def create_tree_view(root, employees, icons):

    frame = ttk.Frame(root)

    treeview = ttk.Treeview(frame, columns=( "Salary","Bonus"))

    treeview.heading("#0", text="Employee")
    treeview.heading("Salary", text="Salary")
    treeview.heading("Bonus", text="Bonus")


    employee_data = prepare_tree_data(employees, icons['female'], icons['male'])

    for city in employee_data.keys():
        # add city
        city_id = treeview.insert('', tk.END, text=city, image=icons['city'])

        # add employees in the city
        for employee in employee_data[city]:
            treeview.insert(
                city_id,
                tk.END,
                text=employee['First Name'] + ' ' + employee['Last Name'],
                values=(format_currency(employee['Salary']), format_currency(employee['Bonus'])),
                image=employee['Icon']
            )
    # create a vertical scrollbar
    v_scrollbar = ttk.Scrollbar(frame, orient=tk.VERTICAL, command=treeview.yview)
    treeview.configure(yscrollcommand=v_scrollbar.set)

    # pack the treeview and scrollbar
    treeview.pack(side=tk.LEFT, fill=tk.BOTH, expand=True)
    v_scrollbar.pack(side=tk.RIGHT, fill=tk.Y)

    # package the frame
    frame.pack(fill=tk.BOTH, expand=True, padx=10, pady=10)Code language: Python (python)
Fifth, define a main() function to create a main window and place the Treeview widget on it:
def main():
    root = tk.Tk()
    root.title("Employee List")

    icons = {
        'city': tk.PhotoImage(file="./assets/city.png"),
        'male': tk.PhotoImage(file="./assets/male.png"),
        'female': tk.PhotoImage(file="./assets/female.png"),

    }

    employees = read_csv('employees.csv')
    create_tree_view(root, employees, icons)

    root.mainloop()Code language: Python (python)
Finally, call the main() function:
if __name__ == '__main__':
    main()Code language: Python (python)
Displaying tabular data #
The following program shows how to use a Treeview widget to display tabular data:
import tkinter as tk
from tkinter import ttk
import csv


def read_csv(filename):
    rows = []
    with open(filename, newline='') as file:
        reader = csv.DictReader(file)
        for row in reader:
            rows.append(row)
    return rows


def format_currency(value):
    try:
        return f"${int(value):,}"
    except ValueError:
        return value


def create_table_view(root, employees):
    frame = ttk.Frame(root)

    # Define the Treeview with columns
    treeview = ttk.Treeview(
        frame,
        columns=(
            "First Name",
            "Last Name",
            "Gender",
            "City",
            "Salary",
            "Bonus"
        ),
        show="headings"
    )

    # Define column headings
    treeview.heading("First Name", text="First Name")
    treeview.heading("Last Name", text="Last Name")
    treeview.heading("Gender", text="Gender")
    treeview.heading("City", text="City")
    treeview.heading("Salary", text="Salary")
    treeview.heading("Bonus", text="Bonus")


    # Define column widths
    treeview.column("First Name", width=150)
    treeview.column("Last Name", width=150)
    treeview.column("Gender", width=100)
    treeview.column("City", width=150)
    treeview.column("Salary", width=100, anchor=tk.E)
    treeview.column("Bonus", width=100, anchor=tk.E)


    # Populate the table with employee data
    for employee in employees:
        treeview.insert(
            "",
            tk.END,
            values=(
                employee["First Name"],
                employee["Last Name"],
                employee["Gender"],
                employee["City"],
                format_currency(employee["Salary"]),
                format_currency(employee["Bonus"]),

            ),
        )

    # Create a vertical scrollbar
    v_scrollbar = ttk.Scrollbar(frame, orient=tk.VERTICAL, command=treeview.yview)
    treeview.configure(yscrollcommand=v_scrollbar.set)

    # Pack the Treeview and scrollbar
    treeview.pack(side=tk.LEFT, fill=tk.BOTH, expand=True)
    v_scrollbar.pack(side=tk.RIGHT, fill=tk.Y)

    # Pack the frame
    frame.pack(fill=tk.BOTH, expand=True, padx=10, pady=10)


def main():
    root = tk.Tk()
    root.title("Employee List")

    employees = read_csv('employees.csv')
    create_table_view(root, employees)

    root.mainloop()


if __name__ == '__main__':
    main()Code language: Python (python)
Output:
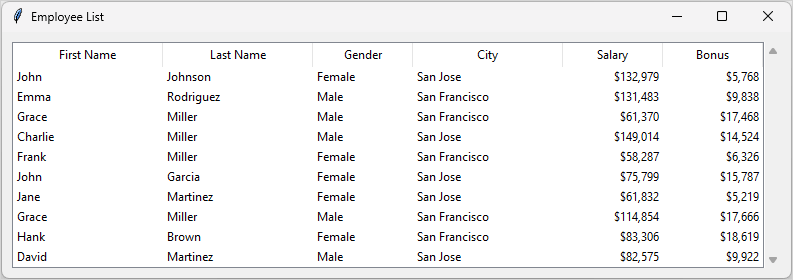
How it works.
First, create a Treeview widget without the default tree column (#0) and displays column headings by specifying show="headings":
treeview = ttk.Treeview(
        frame,
        columns=(
            "First Name",
            "Last Name",
            "Gender",
            "City",
            "Salary",
            "Bonus"
        ),
        show="headings"
    )Code language: Python (python)
This code makes the Treeview widget look like a table (with rows and columns), instead of a hierarchical tree.
Second, define a heading for each column:
treeview.heading("First Name", text="First Name")
treeview.heading("Last Name", text="Last Name")
treeview.heading("Gender", text="Gender")
treeview.heading("City", text="City")
treeview.heading("Salary", text="Salary")
treeview.heading("Bonus", text="Bonus")Code language: Python (python)
Third, define column widths and align the data on the right using the anchor tk.E (E stands for East):
treeview.column("First Name", width=150)
treeview.column("Last Name", width=150)
treeview.column("Gender", width=100)
treeview.column("City", width=150)
treeview.column("Salary", width=100, anchor=tk.E)
treeview.column("Bonus", width=100, anchor=tk.E)Code language: Python (python)
Summary #
- Use a Tkinter
Treeviewwidget to display both tabular and hierarchical data.