Summary: in this tutorial, you’ll learn about the Tkinter Frame and how to manipulate its attributes including sizes, paddings, and borders.
Introduction to Tkinter Frame widget #
A frame is a widget that displays as a simple rectangle. Typically, you use a frame to organize other widgets both visually and at the coding level.
To create a frame, you use the ttk.Frame class:
frame = ttk.Frame(master, **options)Code language: Python (python)A frame has various configuration objects which determine its appearance.
| Property | Meaning |
|---|---|
borderwidth | Specify the border width of the frame. It defaults to zero |
class_ | Set widget class name |
cursor | Change the cursor appearance when the mouse cursor is over the frame |
height | Set the height of the frame. |
padding | To create padding inside the frame and outside of the contained widgets. |
relief | Specify the relief style for the border. To make it effective, you also need to set the borderwidth. |
style | Specify custom widget custom style name |
takefocus | A boolean value specifies whether the frame is visited during focus traversal. By default, it is False. So the frame widget does not accept focus. |
width | Set the width of the frame. |
Frame size #
The size of a frame is determined by the size and layout of the widgets it contains. Also, you can explicitly specify the height and width of the frame when creating it:
frame = ttk.Frame(master, height, width)Code language: Python (python)Padding #
The padding allows you to add extra space inside the frame and outside of the contained widgets. Paddings are in pixels.
To specify padding for each side of the frame separately, you use the following:
frame['padding'] = (left, top, right, bottom)Code language: Python (python)For example:
frame['padding'] = (5,10,5,10)Code language: Python (python)Or you can specify paddings for the left, right and top, bottom as follows:
frame['padding'] = (5, 10)Code language: Python (python)In this example, the left and right paddings are 5 and the top and bottom paddings are 10. If the paddings of all sides are the same, you can specify the padding like this:
frame['padding'] = 5Code language: Python (python)Frame borders #
By default, the border width of a frame is zero. In other words, the frame has no border.
To set a border for a frame, you need to set both border’s width and style.
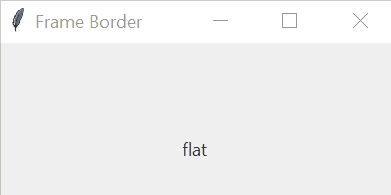
The border’s width of a frame is in pixels. The border’s style of a frame can be flat, groove, raised, ridge, solid, or sunken. The default border style of a frame is flat.
The following example sets the border width of the frame to 5 pixels and the border style of the frame to sunken.
frame['borderwidth'] = 5
frame['relief'] = 'sunken'Code language: Python (python)
The following picture illustrates the border styles of a frame:
Tkinter Frame example #
We’re going to create the following Replace window that is quite common in text editors like Notepad:
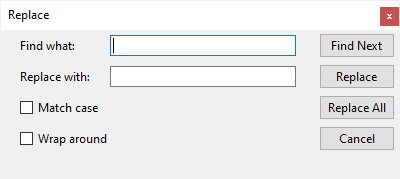
To make the widgets more organized, you can divide the window into two frames:
- The left frame consists of Label, Entry, and Checkbox widgets. The left frame will use the grid geometry manager that has two columns and four rows.
- The right frame consists of the
Buttonwidgets. The right frame will also use the grid geometry manager that has four rows and one column.
To place the left and right frames on the window, you can use the grid geometry manager that has one row and two columns:
The following program illustrates how to create the Replace window above:
import tkinter as tk
from tkinter import TclError, ttk


def create_input_frame(container):

    frame = ttk.Frame(container)

    # grid layout for the input frame
    frame.columnconfigure(0, weight=1)
    frame.columnconfigure(0, weight=3)

    # Find what
    ttk.Label(frame, text='Find what:').grid(column=0, row=0, sticky=tk.W)
    keyword = ttk.Entry(frame, width=30)
    keyword.focus()
    keyword.grid(column=1, row=0, sticky=tk.W)

    # Replace with:
    ttk.Label(frame, text='Replace with:').grid(column=0, row=1, sticky=tk.W)
    replacement = ttk.Entry(frame, width=30)
    replacement.grid(column=1, row=1, sticky=tk.W)

    # Match Case checkbox
    match_case = tk.StringVar()
    match_case_check = ttk.Checkbutton(
        frame,
        text='Match case',
        variable=match_case,
        command=lambda: print(match_case.get()))
    match_case_check.grid(column=0, row=2, sticky=tk.W)

    # Wrap Around checkbox
    wrap_around = tk.StringVar()
    wrap_around_check = ttk.Checkbutton(
        frame,
        variable=wrap_around,
        text='Wrap around',
        command=lambda: print(wrap_around.get()))
    wrap_around_check.grid(column=0, row=3, sticky=tk.W)

    for widget in frame.winfo_children():
        widget.grid(padx=5, pady=5)

    return frame


def create_button_frame(container):
    frame = ttk.Frame(container)

    frame.columnconfigure(0, weight=1)

    ttk.Button(frame, text='Find Next').grid(column=0, row=0)
    ttk.Button(frame, text='Replace').grid(column=0, row=1)
    ttk.Button(frame, text='Replace All').grid(column=0, row=2)
    ttk.Button(frame, text='Cancel').grid(column=0, row=3)

    for widget in frame.winfo_children():
        widget.grid(padx=5, pady=5)

    return frame


def create_main_window():
    root = tk.Tk()
    root.title('Replace')
    root.resizable(0, 0)
    try:
        # windows only (remove the minimize/maximize button)
        root.attributes('-toolwindow', True)
    except TclError:
        print('Not supported on your platform')

    # layout on the root window
    root.columnconfigure(0, weight=4)
    root.columnconfigure(1, weight=1)

    input_frame = create_input_frame(root)
    input_frame.grid(column=0, row=0)

    button_frame = create_button_frame(root)
    button_frame.grid(column=1, row=0)

    root.mainloop()


if __name__ == "__main__":
    create_main_window()
Code language: Python (python)
How it works.
First, import the tkinter module and tkinter.ttk submodule:
import tkinter as tk
from tkinter import ttkCode language: JavaScript (javascript)
Second, create the left frame in the create_input_frame() function. The following code adds paddings to all widgets within the input_frame:
for widget in frame.winfo_children():
    widget.grid(padx=0, pady=5)
Third, create the right frame in the create_button_frame() function.
Fourth, create the root window in the create_main_window() function. The following code removes the minimize/maximize buttons from the window:
root.attributes('-toolwindow', True)Code language: PHP (php)Note that this code only works on Windows.
In the create_main_window() function, we also create the left frame, and right frame, and use the grid geometry manager to arrange them on the root window.
Finally, call the create_main_window() function on the if __name__ == "__main__": block.
Summary #
- A
ttk.Frameis a simple rectangle widget that can hold other widgets. - Tkinter frames are used to organize user interfaces visually and at the coding level.