Summary: in this tutorial, you’ll learn how to use the Tkinter Menubutton widget.
Introduction to the Menubutton widget #
A Menubutton widget is a combination of a Button and a Menu widget.
When you click the Menubutton, it shows a menu with choices. For example:
To create a Menubutton widget, you follow these steps:
First, create a MenuButton widget:
menu_button = ttk.Menubutton(master, **kw)Code language: Python (python)Second, create a new instance of the Menu class:
menu = tk.Menu(menu_button, tearoff=False)Code language: Python (python)Third, add one or more menu items to the menu instance. And you can add Checkbutton or Radiobutton widgets to the menu.
Finally, assign the Menu to the MenuButton instance:
menu_button["menu"] = menuCode language: Python (python)Tkinter Menubutton widget example #
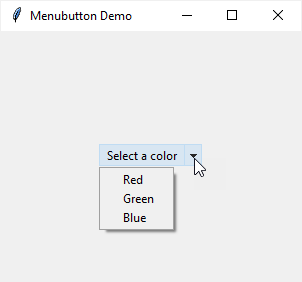
The following program shows how to use Menubutton widget. When you click the MenuButton, it’ll display a menu that consists of three choices:
- Red
- Green
- Blue
When you select a color, the window’s background color to that color:
import tkinter as tk
from tkinter import ttk

# Create the main window
root = tk.Tk()
root.geometry('300x250')
root.title('Menubutton Demo')

# Menubutton variable
selected_color = tk.StringVar()
selected_color.trace_add(
    'write',
    lambda *args: root.config(bg=selected_color.get())
)

# Create the menu button
colors = ('Red', 'Green', 'Blue')

# Create the Menubutton
menu_button = ttk.Menubutton(root, text='Select a color')

# Create a new menu instance
menu = tk.Menu(menu_button, tearoff=0)

for color in colors:
    menu.add_radiobutton(
        label=color,
        value=color,
        variable=selected_color
    )


menu_button["menu"] = menu
menu_button.pack(expand=True)

# Show the main window
root.mainloop()Code language: Python (python)
How it works.
First, define a string variable object that tracks the selected value of the menu:
selected_color = tk.StringVar()Code language: Python (python)When the color changes, the background color will change to the new color accordingly:
selected_color.trace_add(
    'write',
    lambda *args: root.config(bg=selected_color.get())
)Code language: JavaScript (javascript)
Second, create a menu button:
menu_button = ttk.Menubutton(
    root,
    text='Select a color'
)Code language: Python (python)
Third, create a new menu and associate the Menubutton object with the Menu object:
menu = tk.Menu(menu_button, tearoff=False)
menu_button["menu"] = menuCode language: PHP (php)
Fourth, add three Radiobutton widgets based on the colors tuple to the menu:
colors = ('Red', 'Green', 'Blue')
for color in colors:
    menu.add_radiobutton(
        label=color,
        value=color,
        variable=selected_color
    )Code language: Python (python)
When you select a menu item, the value of the self.selected_color variable changes to the value of the selected menu item.
Finally, pack the menu button on the main window and show it:
menu_button.pack(expand=True)
root.mainloop()Code language: Python (python)
Summary #
- Use Tkinter
Menubuttonwidget to create a menu associated with a button.