Summary: in this tutorial, you’ll learn how to structure a Tkinter application using the model-view-controller (MVC) pattern.
Introduction to Tkinter MVC #
As your application grows, its complexity also increases. To make the application more manageable, you can use the model-view-controller design pattern.
The MVC design pattern allows you to divide the application into three main components: model, view, and controller. This structure helps you focus on the logic of each part and make it more maintainable, especially when the application grows.
The following diagram illustrates the MVC design pattern:
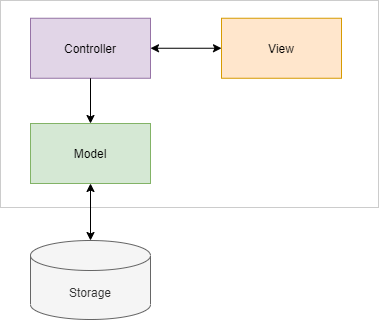
Model #
A model in MVC represents the data. A model deals with getting data from or writing data into storage such as a database or file. The model may also contain the logic to validate the data to ensure data integrity.
The model must not depend on the view and controller. In other words, you can reuse the model in other non-Tkinter applications such as web and mobile apps.
View #
A view is the user interface that represents the data in the model. The view doesn’t directly communicate with the model. Ideally, a view should have very little logic to display data.
The view communicates with the controller directly. In Tinker applications, the view is the root window that consists of widgets.
Controller #
A controller acts as the intermediary between the views and models. The controller routes data between the views and models.
For example, if users click the save button on the view, the controller routes the “save” action to the model to save the data into a database and notify the view to display a message.
Tkinter MVC example #
We’ll take a simple example to illustrate how to apply the MVC design pattern in a Tkinter application:
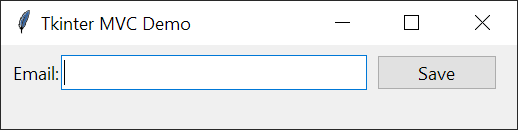
The application that you’ll build contains an entry for entering an email. When you click the save button, the controller calls the model to validate the email.
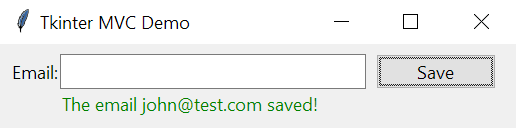
If the email is valid, the model saves the email into a text file and the view shows a success message:
If the email is not valid, the view shows an error message:
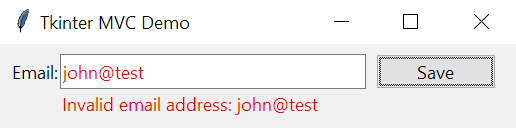
We’ll hide the message after 3 seconds.
Model class #
The following defines the Model class that has an email property:
class Model:
    def __init__(self, email):
        self.email = email

    @property
    def email(self):
        return self.__email

    @email.setter
    def email(self, value):
        """
        Validate the email
        :param value:
        :return:
        """
        pattern = r'\b[A-Za-z0-9._%+-]+@[A-Za-z0-9.-]+\.[A-Z|a-z]{2,}\b'
        if re.fullmatch(pattern, value):
            self.__email = value
        else:
            raise ValueError(f'Invalid email address: {value}')

    def save(self):
        """
        Save the email into a file
        :return:
        """
        with open('emails.txt', 'a') as f:
            f.write(self.email + '\n')Code language: Python (python)
How it works:
- The
emailsetter validates the email before assigning it to the__emailattribute. If the email is not valid, it’ll raise aValueError. - The
save()method writes the email into a simple text file. In real-world applications, you may want to save it into a database.
View #
The following defines the view that shows a form to input an email:
class View(ttk.Frame):
    def __init__(self, parent):
        super().__init__(parent)

        # create widgets
        # label
        self.label = ttk.Label(self, text='Email:')
        self.label.grid(row=1, column=0)

        # email entry
        self.email_var = tk.StringVar()
        self.email_entry = ttk.Entry(self, textvariable=self.email_var, width=30)
        self.email_entry.grid(row=1, column=1, sticky=tk.NSEW)

        # save button
        self.save_button = ttk.Button(self, text='Save', command=self.save_button_clicked)
        self.save_button.grid(row=1, column=3, padx=10)

        # message
        self.message_label = ttk.Label(self, text='', foreground='red')
        self.message_label.grid(row=2, column=1, sticky=tk.W)

        # set the controller
        self.controller = None

    def set_controller(self, controller):
        """
        Set the controller
        :param controller:
        :return:
        """
        self.controller = controller

    def save_button_clicked(self):
        """
        Handle button click event
        :return:
        """
        if self.controller:
            self.controller.save(self.email_var.get())

    def show_error(self, message):
        """
        Show an error message
        :param message:
        :return:
        """
        self.message_label['text'] = message
        self.message_label['foreground'] = 'red'
        self.message_label.after(3000, self.hide_message)
        self.email_entry['foreground'] = 'red'

    def show_success(self, message):
        """
        Show a success message
        :param message:
        :return:
        """
        self.message_label['text'] = message
        self.message_label['foreground'] = 'green'
        self.message_label.after(3000, self.hide_message)

        # reset the form
        self.email_entry['foreground'] = 'black'
        self.email_var.set('')

    def hide_message(self):
        """
        Hide the message
        :return:
        """
        self.message_label['text'] = ''Code language: Python (python)
How it works.
- First, create the widgets in the
__init__()method. - Second, define the
set_controller()method to set a controller. - Third, call the
save()method of the controller in the click event handler of the save button. - Finally, define the
show_error(),show_success(), andhide_message()methods to show/hide the message.
Controller #
The following defines a controller:
class Controller:
    def __init__(self, model, view):
        self.model = model
        self.view = view

    def save(self, email):
        """
        Save the email
        :param email:
        :return:
        """
        try:

            # save the model
            self.model.email = email
            self.model.save()

            # show a success message
            self.view.show_success(f'The email {email} saved!')

        except ValueError as error:
            # show an error message
            self.view.show_error(error)Code language: Python (python)
How the controller works.
- First, assign the model and view in the
__init__()method - Second, define the
save()method that saves the model into the text file. If the model is saved successfully, show a success message. Otherwise, display an error message.
Application #
The following defines the App class that uses the Model, View, and Controller classes:
class App(tk.Tk):
    def __init__(self):
        super().__init__()

        self.title('Tkinter MVC Demo')

        # create a model
        model = Model('[email protected]')

        # create a view and place it on the root window
        view = View(self)
        view.grid(row=0, column=0, padx=10, pady=10)

        # create a controller
        controller = Controller(model, view)

        # set the controller to view
        view.set_controller(controller)


if __name__ == '__main__':
    app = App()
    app.mainloop()Code language: Python (python)
How it works.
- First, create a model.
- Second, create a view and place it on the root window.
- Third, create a controller and set it to the view.
Put it all together.
import re
import tkinter as tk
from tkinter import ttk


class Model:
    def __init__(self, email):
        self.email = email

    @property
    def email(self):
        return self.__email

    @email.setter
    def email(self, value):
        """
        Validate the email
        :param value:
        :return:
        """
        pattern = r'\b[A-Za-z0-9._%+-]+@[A-Za-z0-9.-]+\.[A-Z|a-z]{2,}\b'
        if re.fullmatch(pattern, value):
            self.__email = value
        else:
            raise ValueError(f'Invalid email address: {value}')

    def save(self):
        """
        Save the email into a file
        :return:
        """
        with open('emails.txt', 'a') as f:
            f.write(self.email + '\n')

class View(ttk.Frame):
    def __init__(self, parent):
        super().__init__(parent)

        # create widgets
        # label
        self.label = ttk.Label(self, text='Email:')
        self.label.grid(row=1, column=0)

        # email entry
        self.email_var = tk.StringVar()
        self.email_entry = ttk.Entry(self, textvariable=self.email_var, width=30)
        self.email_entry.grid(row=1, column=1, sticky=tk.NSEW)

        # save button
        self.save_button = ttk.Button(self, text='Save', command=self.save_button_clicked)
        self.save_button.grid(row=1, column=3, padx=10)

        # message
        self.message_label = ttk.Label(self, text='', foreground='red')
        self.message_label.grid(row=2, column=1, sticky=tk.W)

        # set the controller
        self.controller = None

    def set_controller(self, controller):
        """
        Set the controller
        :param controller:
        :return:
        """
        self.controller = controller

    def save_button_clicked(self):
        """
        Handle button click event
        :return:
        """
        if self.controller:
            self.controller.save(self.email_var.get())

    def show_error(self, message):
        """
        Show an error message
        :param message:
        :return:
        """
        self.message_label['text'] = message
        self.message_label['foreground'] = 'red'
        self.message_label.after(3000, self.hide_message)
        self.email_entry['foreground'] = 'red'

    def show_success(self, message):
        """
        Show a success message
        :param message:
        :return:
        """
        self.message_label['text'] = message
        self.message_label['foreground'] = 'green'
        self.message_label.after(3000, self.hide_message)

        # reset the form
        self.email_entry['foreground'] = 'black'
        self.email_var.set('')

    def hide_message(self):
        """
        Hide the message
        :return:
        """
        self.message_label['text'] = ''


class Controller:
    def __init__(self, model, view):
        self.model = model
        self.view = view

    def save(self, email):
        """
        Save the email
        :param email:
        :return:
        """
        try:

            # save the model
            self.model.email = email
            self.model.save()

            # show a success message
            self.view.show_success(f'The email {email} saved!')

        except ValueError as error:
            # show an error message
            self.view.show_error(error)

class App(tk.Tk):
    def __init__(self):
        super().__init__()

        self.title('Tkinter MVC Demo')

        # create a model
        model = Model('[email protected]')

        # create a view and place it on the root window
        view = View(self)
        view.grid(row=0, column=0, padx=10, pady=10)

        # create a controller
        controller = Controller(model, view)

        # set the controller to view
        view.set_controller(controller)


if __name__ == '__main__':
    app = App()
    app.mainloop()            Code language: Python (python)
Summary #
- Use MVC to structure the Tkinter applications to make them more organized.